 Teaching the kids to navigate, inspired by posts in this blog:
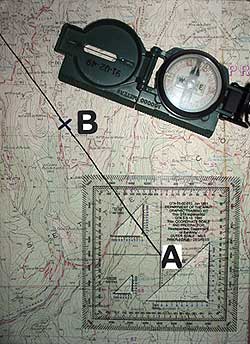
It was probably months ago that I ordered a topographical map of our immediate area, and bought a modern compass to use with it. With my trying to finish the RR coach, my daughter’s wedding, and other things; I haven’t been able to get serious about the map reading lessons shared at the Weapons Man Blog.
We took the map out into the woods and hills a while back, to see if we could spot the terrain features on the map. That was fun, but this was more serious instruction. I ordered the map with magnetic north lines printed on it; so I didn’t have to compensate (azimuth?) 3 degrees for that. In the pictures below is the story of how our first lesson went, and a few other activities.
We’re humbled, and pleased. The navigation came out a little off — not enough to be off the map sheet, but enough to show how difficult dead reckoning navigation really is. Trust us that, with practice and care, one gets a lot better at it.
The terms used when compensating for the delta between magnetic north and true north are Variation and Declination. These vary by location and time and maps can display them by showing isogonic lines (on a large-scale map like a Joint Operations Graphic, good for planning D-Day, or an aviation sectional chart) or a Declination Diagram (used on small-scale, topographic maps). The Declination Diagram also shows you how to compensate for change over time (in the short term, such change is predictable, and so mapmakers incorporate the trend in the legend of the map). Large-scale maps don’t do this because they’re replaced more frequently — the life span of an aviation sectional chart is a few months.
It is possible to automatically compensate for the true-magnetic angle (or, if using a grid system, grid-magnetic angle) on Google Maps by using Google Compass by the private Barcelona Field Studies Centre. We can’t vouch for its security or likely longevity, and unlike a paper map and compass, you’re not going to have Google Diddly when the grid is down, but for now it’s a useful learning tool.
Go Read The Whole Thing™ (his vehicle-painting stuff is interesting, too).
Land Nav: Terrain Features and “Seeing” Them
An understanding of terrain features is necessary for land navigation.
If you are in terrain with high relief (think of the Swiss Alps), then you’ll have no trouble at all.
Consider how terrain features look when you are on them. (The Army, whence we stole these graphics, also teaches you to visualize the terrain features by looking at your fist and hand. An example of how that do that is in this presentation).
A hill is easiest, and its a very common feature. From the summit of a hill, the ground slopes down in all directions. On the map, it is the center of a ring or rings of contour lines.
A depression is opposite of a hill. It is fairly rare, but in a depression the ground slopes up in all directions. Such a feature is rare because nothing shapes terrain as inexorably as water, and water seeks an outlet. If it does not find one, in due course, it makes one. Depressions either are in very very arid climates, have some means of draining water direct down out of the bottom, or evolve into lakes or ponds. On the map, a depression looks like a hill — a circle — except that it has tickmarks on the low side, the inside of the circle.
In a saddle, the ground is higher in two directions that are approximately 180º from each other, and lower in the other two directions offset at 90º from the high ground. On the map, the saddle is where the lower contour lines on a hill merge to also wrap around the adjacent hill.
A more common feature puts you in a place where the ground is higher on three sides and lower on one. Depending on the dimensions this is a valley or a draw.
 We think of the grounds at Hog Manor as “level,” but they aren’t, really, it’s more an illusion created by the previous proprietor’s landscapers. You actually have to go down a half-flight of stairs to get to the garage, but from the same point, up a full flight of stairs to get to the Music Room over the garage. The half-flight is absorbed by a high ceiling in the garage, preserving the illusion of a building with all its modules on the same level, until you start doing mental math. It’s architectural trompe l’oeil, and is so common most people never notice it.
In the front yard, this non-levelness manifests as two almost level areas with a retaining wall in between. In the backyard, a variety of stone features try to conceal the slope, but the ancient 18th or 19th Century stone wall between lawn and wood betrays the true slope of the terrain.
So the real understanding of “level” is — compared to what? We grew up on a less level lot, where careless riding mower operation could (and did) roll the mower. We had a similar experience, learning land navigation in the hills and mountains of New England, and then going to Fort Bragg where one must sink or swim in a navigation environment with much less relief.
In that case, you have to learn to look straight in the distance in the various directions around you, and be able to see where the ground is higher and lower compared to your standpoint — even if the height difference is only a hand’s breadth or two. Once you visualize where it’s higher or lower, you should see just that on your map. In time and with practice, the correlation between map and ground gets to be second nature, and is only disrupted if you are in a new location with very different relief. Even then, the more experience you have, the more easily you orient in new physical environments.
Land Navigation Part 3: Compass and Pace
Sergeant First Class Roner was probably of average height, or a little above, but thanks his bearing he seemed tall. He had broad shoulders and the lean build of an all-round athlete, and a mop of curly black hair that was cut by a barber who knew what he was about. He completed the image with gold-framed and mirrored Ray-Bans, a Rolex Submariner, and a set of camouflage fatigues that were tailored just enough to underline the fact that he took pride in his martial appearance, and not too much so we could all see that he was not a garrison soldier who would dress impractically. On the instructional podium, which is where we knew him from, his native Panamanian accent was offset by a natural actor’s — or maybe a trained one’s, for all we knew — projection and diction. He was altogether the sort of thing we called Hollywood, which in our circles was not a term of endearment.
And we might have been just a wee bit jealous, because SFC Roner already had his, and he was a gatekeeper who stood athwart our path to having ours. Special Forces qualification, that is. In a minute he was going to release us on the Day Land Nav course, aka the Star Course, and in the next three days or so about half of us would be gone.
“Rrrolex time isss,” he announced, and gave us the time hack. One of the other instructors had tried to hand him a bullhorn; he didn’t take it. He didn’t need it; we were so on edge that he could have whispered, but his voice carried across the broken camp. “You have eight hours from release… in five, four, three, two, one go!”
And at that most of the guys went. Some of us took a moment to confirm an initial azimuth and then we trotted off, counting each step. Over the next two days we’d walk, run or jog almost 50 kilometers by day and 18 in the dead of night, with ruck, rifle and gear, hitting multiple points, each one usually miles from the last. It was hit the points, or hit the truck. You didn’t want to hit the truck.
How did we do it? With two essential tools: compass and pace, and an ancient form of navigation called Dead Reckoning. Dead Reckoning depends on the principle that if you begin from a known point, and then make a movement of a given azimuth for a given distance, there is only one point you can be at when you stop.
In a flat, unobstructed world, all you would need is a map, to plot your start and end points; a compass, on which you could set your azimuth; a pace count, which translates your steps into real distance; and willingness to trust those tools, to go to anywhere you can walk to on land.
In the real world, there are more problems but there are also more tools you can use. The difference between the graduates and the recycles (or NTRs) at SFQC was often those extras, because by this point, you had map, compass, and pace count down.
The Map and Azimuth
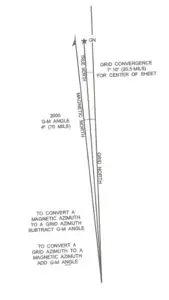
This is a declination diagram (this one’s from this post, where the use of one is explained).
Plotting your course on the map requires you to know where you are. (There are various ways to determine this, if you’ve become, in Daniel Boone’s terms, “a mite bewildered.” But let’s assume arguendo that you know that, for now). And it requires you to know where you’re going.
Now, draw a line between Point X and Point Y — if you can go straight. (You might need to make your course several shorter legs because of obstacles). If you must make a turn, make every effort to make it on a recognizable terrain feature. “I’ll be on the summit of this hill, and when I turn to my new azimuth there will be low ground on three sides and a saddle on my right.” Note the distance. “It’s 1700 meters.” Now do the next leg, and so on to your destination. Time spent plotting is never time wasted; you’re impressing the expected terrain in your mind. (Maybe not the first time you do it, but soon enough, with practice).
Now go back over your legs and look for additional checkpoints. “At 700 meters, on the first leg, I cross power lines. From there it’s 1000 meters to my turning point on the hill. On the second leg there’s a lake on my right; it should be closest to me at about 2100 meters down that leg.”
Military protractor
The azimuth? It’s simply the angle at which your course diverges from magnetic north. But your map is marked with convenient grid lines that are not aligned with magnetic north, so you have to adjust your grid azimuths to magnetic azimuths. Failing to do that, or forgetting the step because you’re too tired, is a traditional ticket out of Special Forces training and down the road to the 82nd Airborne Division. NTTAWWT.
The Army provides two cheats that help you determine your azimuth. One is a clear plastic square with 360 degrees marked on it, called a “protractor,” and the other is the “declination diagram” on the map which tells you how much grid north is offset from magnetic north right here and right now. Many models in the Silva compass line include a clear base with similar markings. The instructions for using the declination diagram are marked right on the map, but most folks will never do it successfully in the field if they haven’t done it at a desk at least once before. But if you do it right, you now have a map azimuth for each leg.
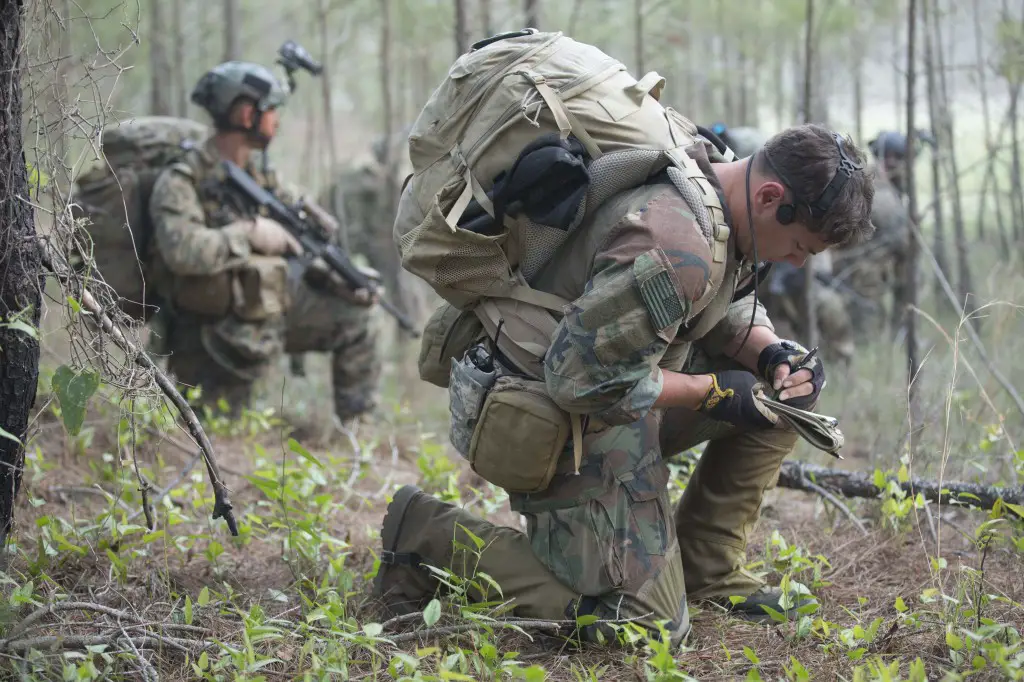
MARSOC (er, Raider) Special Operations Officer 0370 candidates in training. USMC Photo.
Time spent plotting is never wasted, and shortcuts in plotting will not help as much as you think.
The Compass and Azimuth
Compasses usually have some kind of ring that you can set so that the north-seeking arrow is aligned with magnetic north while some indicator on the compass points towards your destination — or at least your next checkpoint. This ring in the service is called the “bezel ring” which is redundant, but there it is. (The compass maker often uses just “bezel.”)
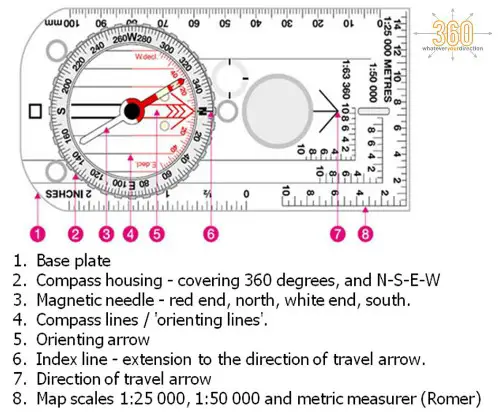
The Silva compass is practical and simple, although it’s not as effective for two purposes as a genuine military lensatic: for such things as calling artillery fire or otherwise taking a bearing, one, and for use at night, because the military compass includes tritium ampules in the needle and orienting indicator. (You can get some after-dark use out of the Silva by sticking luminous material to the base to backlight it). The Silva is great at picking up your azimuth from the map for you (remember to correct for declination with military maps and as needed).
It can be difficult walking in a straight line in some environmental conditions. For example, in forest you cannot see very far. So, line up your azimuth, pick a prominent tree in line with your azimuth, walk to the tree, and shoot the azimuth again, pick a tree — repeat as needed. Once you have your tree or other target picked out, you can just walk there and don’t need to play with the compass. (When you’re new at this, you’ll probably do a lot of crosschecks as your confidence builds. That’s OK!)
In this manner you can walk straight and avoid being turned around, even when you have to walk for miles and miles.
Pace Count
OK, so we’ve solved half of the polar-coordinate problem that is navigating by Dead Reckoning, to wit, azimuth, or, for the vocabularily challenged, “the left-right thing.” So we know where to go; how do we know then next piece of vital information, when to stop? We do it by counting our steps.
To establish your pace count in a given terrain (and while bearing a given weight, because load-bearing changes your gait), you need to count your steps over a known distance on similar terrain. Walk the same distance course several times in both directions, then average your total steps, then reduce to a rate of steps per 100m.
Then, when you’re walking, count your steps by the hundreds of meters, mentally cross-checking the expected terrain. When you make it to 100m, by pace count, note that and start counting again. At first you will constantly cross-check terrain against your pace count (“Should I be crossing a road at 450 meters?”), but in time you will come to use it confidently.
Put it all together, and with map, magnetic compass, and pace count you can go anywhere (well, you’ll have problems in the far arctic or antarctic. But in the temperate, tropical and subtropical latitudes most of us dwell in, you’ll be pretty mobile cross-country.
There are advantages to this. Most of humanity, and in First World countries almost all of humanity, is road-bound. With a map, a compass, and two good legs, you are not.
Learning Land Navigation: Second in a Series: The Topographic Map
The best case is to have a map and a compass. If you have a general idea of the terrain you can navigate without either, of course. But if you have to choose one or the other, unless the map is complete crap, choose the map.
Why not choose a GPS? A GPS depends on things that you cannot control, including satellites (vulnerable to interception and destruction in wartime, and failure in peacetime) and the electromagnetic spectrum (vulnerable to jamming, meaconing, EMP and other QRM — manmade interference — and sunspots, areas of bad radio propagation (like iron-rich geological formations), and other QRN — natural interference.
Jamming GPS signals is child’s play, because (1) the frequencies used are fixed and published, and (2) a satellite is sending a very low-power signal from very far away.
A GPS also depends on something that has a knack for letting a guy down: batteries. GPS navigators and other smart devices are an update of the old pilot’s joke about a flashlight: something you put in your bag to hold dead batteries. (There are circumstances in which this joke is the very living soul of not funny).
What’s a Topographical Map?
A map is a graphic description of a physical place in (usually) plan view, meaning from an imaginary viewpoint overhead. There are innumerable kinds of maps. Planimetric maps are drawn to scale (of which more in a moment), show borders and boundaries, (usually) cultural features like roads, and coast- or water-lines. If you own a house or land, you have probably seen your lot on a planimetric map. A Mapquest street map page is a planimetric map (it’s also a thematic map, which is a kind of map that has a theme, naturally. Thematic maps can be planimetric, but don’t have to be).
A topographical map is a type of planimetric map that also shows the height of the terrain. How do you show the Z axis of the real world on a two-dimensional map? The convention for depicting height on modern topographic maps is to use isometric lines. That scary foreign word just means “same distance,” iso metric, see? So each height-depicting line on the map represents the same vertical distance as the others. This has some useful applications in the real world, which is where we want to use our maps, right?
It is the isometric lines or contour lines (so called because each line follows the contour of the land at a given height relative to mean sea level) that set a topo map (as we call them to save keystrokes) apart from other kinds of maps.
Unless you have occasion to work with very old maps, military topographic maps will be calculated in SI units, with isometric lines a fixed distance apart in meters and marked elevations (of benchmarks, hilltops and other significant Z Axis features) in meters as well, and distances and a scale in kilometers. In the US, topo maps made for civilian use will have these items marked in Imperial units — feet and miles.
Globally, topographical maps are very similar. Anyone who has used a British Ordnance Survey Map, USGS Map, or NATO military map can pretty much make the translation to the others no problem. Even a Russian or Chinese map is very useful (the Russians have always made superior maps). Even if you can’t read the language you can still see the terrain. The various grid systems used are not always interoperable, though. (We’ll get to that).
What’s On A Topographical Map?
There are essentially three things: the geological features, which include the basic shape of the terrain, things like hills, rivers, coastlines, and slopes; the cultural features, which are the things that grow on the terrain or that people build on it, like forests, villages, roads and railroads; and navigational and informational features, including various things that let you use the map.
Geological Features
 A map can give you a good handle on terrain features, if you read the contour lines. This bit of instruction uses the topography of human hands to walk you through the most common terrain features. There’s a lot more the lines can tell you, and you pick it up instinctively sooner or later. For example, on any given map, since contour lines come only at one interval, the closer together the lines on the map, the steeper the terrain. You will notice that watercourses are always in the low point, and that contour lines form a V across the watercourse, with the narrow end of the V pointing uphill and upstream. Bodies of water and watercourses are geological features, and they are always depicted in blue.
This web page recycles government training materials meant to train soldiers to understand the association between the contour lines on their maps, and the terrain on the ground. It shows the basic terrain features; the hill above is one of them. (The page may have an annoying popup. Just dismiss it).
Cultural Features
Cultural features include vegetation, usually shown as green, and anything humans built on the land, including roads, bridges, trails, railroads, power lines, structures, cities, etc. As a rule of thumb, geological features are more stable and useful for navigation that cultural ones. Barring Air Force intervention, a hilltop’s height isn’t going to change. The shape of roads and borders of towns change all the time.
Navigational and Informational Features
There are many of these, including the Legend, which describes the sorts of features you might see on the map; the declination diagram, which we’ll deal with in the next installment; the indicator of north (part of the d.d.) which is rather important; and information about the datum used (this is the mathematical description of the shape of the Earth that undergirds the navigational features) and the grid system. This is where we run into differences by nation and even by purpose of the map and its recency. Datums are occasionally updated and this means grids aren’t interoperable (some US maps still used the North American Datum of 1927 (NAD27) during our service, and other maps used WGS83 or another datum — a hazardous combination when you’re slinging lead and steel around). The Russians and their allies, for example, use a different grid system (Gauss-Krasovskiy) than NATO and their allies (MGRS, which is a superset of the Universal Transverse Mercator system). This gets interesting when you have lots of nationalities interoperating in one battlespace, but for most of you, the way to deal with this is:
- Check that everybody’s map has the same Datum and grid system.
- If not, get help! Your friendly SF intel sergeant can probably do MGRS to GK grid conversions, and your weapons guy can deal with artillery tuned with different numbers of mils in a circle.
 Maps have grids that are set up for a military-type grid reference system, which should let you plot a point quite accurately, or alternately for latitude and longitude, depending on their intended use. Lat/Longs are hard to use in an on-foot situation, because in most of the world parallels and meridians don’t intersect quite squarely. The good news is, that even a map only gridded with lat/longs usually has ticks you can use to set up a UTM grid.
Grids are always read right and up. In map terminology, that’s easting and northing. How and why the grids are set up is part of every military map reading class, but do you know what? You don’t need to know it, any more than you need to know how a torque converter works to drive a car. Yes, it’s great to have knowledge in depth, but right now, you need knowledge you can use.
Some Homework if you want it:
Reading Topographic Maps, by the OK Geological Survey.
Reading-Topographic-Maps-Oklahoma-Geological-Survey.pdf
Learning Land Navigation: First in a Series
Well, there’s some pent-up demand for land-navigation how-tos around here. This post will, mostly, just scope the problem.
Navigation implies knowing where you are, where you are going, how you got here, where (and how) you’re going next, and how to get home — not to mention, how to go off in some new direction if the mission changes. Army SF and some other SOF units domestically and internationally think of Land Nav as a foundational skill, a capability enabler or “building block,” and during assesment, selection or primary training, a Must Pass evolution or gate. As a result, guys like SF, certain other ARSOF elements, and some of our international friends (SAS for instance) are some navigatin’ fools.
Anybody wearing the long tab or Green Beret of Special Forces or the equivalent heraldry of the other units mentioned has proven his ability to depart from an arbitrary point and journey to other points 10 to 20 km away, repeatedly, in a straight line, day or night, across any terrain and in any weather. He can find himself on the map (even if all he has is the map, no compass, and no idea where he is on the map). He can also determine with confidence that he is not on the map, and that is occasionally necessary (usually there are thanks due to the US Air Force or other aviators for this sad turn of affairs).
That is a lot of capability and if we started off trying to do that on Day 1, 98% of us would fail. Instead, we eat the elephant a bite at the time, absorbing (and testing) both big-picture concepts, which undergird the whole skill, and many, many microtechniques which, when assembled and drilled thoroughly with increasingly challenging exercises, combine into what looks like a single fluid skill.
Most experienced special operations soldiers navigate primarily by terrain association, when the terrain permits (and by dead reckoning when it does not). They have often formed a mental picture of terrain they will navigate before they ever cross it. The map is not referenced all that often, except in the form of the mental map that one works from.
Navigation techniques depend on terrain. We learned to navigate as a kid, “messing around in boats,” and then in our early SF career as a support guy, mostly in hilly and mountainous terrain. Going to Fort Bragg and Camp Mackall, where the terrain was much more mild, with much less relief, we initially couldn’t even see the terrain features. It was flat as a table, to eyes accustomed to the Green Mountains and White Mountains of New England. At first, we managed by navigating solely by dead reckoning, as if it was flat; in time we came to “see” the hills, ridges, draws and saddles that had been right in front of us all along, but were simply too low in relief.
Navigation techniques also depend on how you’re traveling. Which vehicle, and how fast? If you are accustomed to traveling with LPCs (Leather Personnel Carriers = “boots”) and you hitch a ride with an Abrams platoon, you can’t imagine the tankers keep themselves located at 30 miles an hour, but they do.
Next up: the topographic map, and after that, terrain features.

Kevin was a former Special Forces weapons man (MOS 18B, before the 18 series, 11B with Skill Qualification Indicator of S). His focus was on weapons: their history, effects and employment. He started WeaponsMan.com in 2011 and operated it until he passed away in 2017. His work is being preserved here at the request of his family.