 Bear with us as we talk about two disparate things — screwing up and hand tools. They both go tool in hand, er, hand in hand. And it all started in the workshop today.
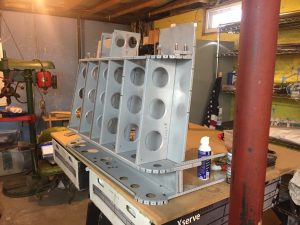
We have the center section of the airplane starting to come together on a temporary table (horses and MDF) down in the gunsmiting lab. (Yes, before anyone asks: when it’s complete, it will fit out at least one of the three exits. We measured).
Ah, “measured.” What a fine and noble word that is. And what grief befalls the workman who neglects to do just that. And thereby hangs a tale. (Does a tale hang by its tail? Only its tailor knows for sure).
Over the last few nights we prepared to install the baggage compartment floors, structural parts that are fastened to a built-up section of the main spar carry-through by approximately three dozen solid rivets. After a scan of the plans, most of the rivets were emplaced as AN470AD4-8s, and four outboard rivets that went through an additional .040″ or so were emplaced as AD4-9s. These rivets are identical rivets except for the length.
There is a code to AN rivets, which is inscrutable to the uninitiated but becomes second nature after the 3,712th one you’ve driven (or maybe it’s the 882nd one you’ve drilled out because you drove it wrong). These two sizes break out as follows:
| Item | AN | 470 | AD | 4 | 8 |
| Meaning | Army-Navy standard | Standard round head rivet | shank dia. 4/32″ | shank length 8/16″ | |
| Item | AN | 470 | AD | 4 | 9 |
| Meaning | Army-Navy standard | Standard round head rivet | shank dia. 4/32″ | shank length 9/16″ | |
Before our European and Antipodean friends begin grumbling about the superiority of the French Revolution’s system of weights and measures (if they were going to keep something of Robespierre’s, why not the guillotine? But we digress).
The rivets were difficult to drive because the sheet metal floorboards themselves limited tool access. We drove them using teamwork and great care, worried about putting a “smile” on a rivet head and having to drill a rivet out.
Today, as we contemplated a neatly driven row of AN rivets, the Blogbrother revisited the plans page and came up with an unwelcome insight:
“Hey, I think we put in the wrong rivets.”
“Nonsense. Dash-8s, and 9s for the two outboard rivets on each side where they go through the upright, too.”
“That’s not what the plans say. Dash-9s and 10s.”
“Uh. Intercourse.”
So now we didn’t have to drill out one mashed “smiley.” Nope, we had to drill out all 36 or so rivets. Every single one is 1/16″ too short. And the part they’re embedded in is a structural part: there’s no margin for error.
We set to drilling. Which brings us to hand tools.
Our grandfather often drilled a hole with a traditional hand drill, a bit and brace, or a small thing we called a “hand drill” but have since learned is actually properly named a “pin vise.” Today, most workshops don’t have any drill but an electric drill, and usually it’s an enormous cordless monstrosity with a gigantic battery hanging off it.
Now, it’s possible to drill these rivets out with a power drill and a long (12″) bit. But this is where the voice of Gamuck speaks to us and sends us to the hand tools. For $50 you can get a collection of pin vises in various sizes, and they have a bunch of uses. (For instance, that #60 drill that the chuck of Monster Drill won’t hold? Chuck it in a small pin vise, and then chuck the pin vise in Monster Drill. If all the chucks are concentric — not always guaranteed if you buy cheap, or even if you don’t, we’ve seen Starrett pin vises that were nonconcentric or out of round — it’ll work just fine).
You should have one or two big pin vises and a set of small ones. (If you like to keep a lot of bits handy, you can use double-ended small ones, but label the GD bits). What we’ve got in the shop is just that: a large heavy pin vise (about the size of a screwdriver handle) made by General Tool, the generic name for Chinese stuff in Ace Hardware or Harbor Fright); one about the same size but very light due to a hollow handle (for storing common bits), from the Israeli firm Shaviv, one small one with a cap with a bearing, made in India, and a set of generic small pin vises with solid handles, also made in India (these are the ones ideal for chucking into the Drill Monster).
Along with these, you’d be surprised with how much metalwork you can do with a set of files and one of stones, and a hacksaw and assortment of blades. With hand tools you can feel the metal directly. Yes, you lose speed compared to power tools. But what you gain is control.
Consider our problem, a row of rivets that had to be drilled out because the shanks were all 1/16″ too short before being squeezed, but where a power drill with normal jobber-length bits would not have access. There were three ways to do this that came immediately to mind:
| Name | Pro | Con | |
| 1: Power Tool Solution | Drill Monster with 12″aviation-length bit | Fastest solution | High probability of enlarging or misshaping hole |
| 2: Hand Tool Solution | Drill bit in pin vise | Great control at all times, low probability of overdoing it | Slow as molasses |
| 3: Hybrid solution | Mark, hand drill to start hole, finish with power drill | Best balance of rapid completion and no damage | Slow, fiddly, lots of “paradigm shifts” for guys doing it. |
Needless to say, we went with option #3. AN rivets have a tiny dimple at the center of the head, just to assist if you should have to drill the rivet out. We expanded this dimple with a center punch (another must-have tool, and one you can safely buy cheap). Five or six hits with the spring-loaded center punch made the dimple an even more prominent divot. Then, turning a #35 bit in the large, heavy pin vise, taking great care to make a good, centered cut, we cut enough of a hole in the rivet head that a carefully used aviation-length (12″) #35 drill bit in the Drill Monster would weaken the rivet enough for removal.
It’s going exactly according to plan. No parts damage, and so far all the rivets we’ve addressed are drilled through and removed, and we should finish the removal tomorrow.
And of the fact we once rived two skins on wrong, no more evidence will exist soon, except for this moldering blog post.
But no matter what you’re building, check out a variety of pin vises. They’re simple, cheap tools that are lifesavers when the hole is important enough that you want to feel it being cut.

Kevin was a former Special Forces weapons man (MOS 18B, before the 18 series, 11B with Skill Qualification Indicator of S). His focus was on weapons: their history, effects and employment. He started WeaponsMan.com in 2011 and operated it until he passed away in 2017. His work is being preserved here at the request of his family.
32 thoughts on “Shop Soulcraft”
I disagree about cheap Automatic/Tinsmiths centerpunches. They wear out quickly and are difficult to set for a repeatable strike. A Record, Sun or Hozan brand one will be a revelation after using garbage ones.
Even here, where everything is expensive a top quality one is still under $50, and worth every cent.
We don’t have those specific brands here, but about the same price for a top-quality First World (USA, EU, Japan, maybe Taiwan) punch. Amazon has Starretts (there are several sizes) for US $35-45, and it’s a couple bucks more from gunsmith suppliers like Brownells or Midway. I just read some Amazon reviews of the Starrett punches, and guys who bought the heaviest-duty steel-working punch for doing wood work are complaining it takes too much force… that’s where the couple dollars goes, the Brownells phone guy would steer you to the right punch!
A quality one can be adjusted for lower effort and lesser strike. Simply turn the top section to change the spring load at the tripping point.
Sunflag brand not Sun.
http://autotradetools.com.au/products/sunflag-auto-centre-punch-185
I maintain to my gunsmithing students that, when working on guns, hand tools are often far better than power tools (esp. the thoroughly evil Dremel tool). Why?
Because with hand tools, you can arrest your mistakes before they’ve passed the point of no return. With power tools, the screw-up is complete and done often before you have time to blink.
As I delight in showing my students (most of whom are well versed in how to use CAD/CAM systems to drive CNC machines), you can accomplish quite a bit with hand files, once you know that there are many more hand files available than the paucity you can obtain through Home Depot. I have files that have no other reason for existence other than filing in the 65 degree dovetails or slide rails on a 1911. That’s all they’re used for – they’re single-purpose hand files. I have other files that are in my shop only to strike barrels, and yet others which work only on wood stocks. Then I have files that are best used on stainless steels, others that are optimized for use on soft metals like aluminum and brass.
For small drillbits, another tool to seek out is a Jeweller’s drill. Imagine a pin drill where you could make it twist two turns by moving a collar down the pin vise…
I’ve seen those jewelers’ drills, and they reminded me of an “automatic” screwdriver I had as a kid that was Rube Goldberg junk.
One more thing about hand tools — while you can have “one tool for one job”, a hand tool often has a lot more versatility than a power one. Force, speed, stroke, is all within the workman’s control, to the limit of his fine motor skills. Hand tools and patience came to me in middle age, eh. God alone knows what I wrecked before that.
Do you have recommendations for good quality file manufacturers? I have noticed the old line American brands are getting worse. Not American anymore either.
Hognose, typo- at the end of your code description for the #9 rivet, there is a 0- should it not be a 9?
Yep on the typo, thanks Raven
You’re correct – Nicholson has gone downhill like a greased toboggan over a cliff – thanks to the perpetual ignorance of American corporate management, almost all of whom don’t know jack about tools. Why would they? What do Harvard MBA’s need with getting their precious, well-manicured hands dirty? That’s why they went to Harvard, right?
Nicholson has pushed all file production off-shore to Mexico, Brazil and Columbia. I was just looking a Nicholson two-sided rasp last night that a student showed me, and it was made in Columbia. It was a horrible piece of crap; the teeth were rounded off, and upon a quick test, it appears that the steel is too soft – which is one of my biggest complaints about off-shore file production: they don’t know steel. It’s either too hard, and teeth fracture off, or it’s too soft, and the cutting edges dull. What they obviously don’t know about heat treatment of steel could fill volumes…
The following is just my not-terribly-humble opinion on the subject of hand files. When you’ve purchased as many hand files (new and used) as I have (which is hundreds of hand files) and you spend as much time every year with a file in your hand (100’s of hours), you develop opinions.
1. Nicholson’s files are now basically crap. If all you’re doing is putting a rough edge onto a lawn mower blade, that you know your kid is going to scrape off on the next rock in the landscaping, well, OK, use a crap file. But if you need a hand file that is going to do a job and you need the job done properly and well, look elsewhere. It really pains me to say that, but there’s no way around this any more.
2. Simonds now makes their files off-shore; only their premium files are really worth any money, IMO. They’re from (IIRC) Honduras.
3. OK, there are, IMO, only two top-drawer file makers left in the world: Vallorbe/Grobet (but only those made in Switzerland) and Pferd. Grobet Swiss is the good label; the “Grobet USA” marque of files is made in India or China. Pferd is German for “horse” and the horse is their logo. They started out making farrier’s rasps, and got into a whole line of files. The Pferd “Corinox” line of files for filing on stainless steel are very, very nice – when you have to work on stainless. I work on stainless when I’m making knife blades – which is a hobby, not a business for me. My wife wonders why I do such things, but I’m perpetually pissed off at the crap sold as knives for kitchen use. I could get by with nothing more than a K-Bar for a kitchen knife, but the wife seems to disagree with my choice of knives, so I’ve made a couple of kitchen knives in the pairing to utility size. Corinox files are harder than a whore’s heart, and this becomes very important when you’re filing on some alloys of stainless, which can tend to work harden as you’re filing on them. If you don’t have a hell of a hard file, you’ll turn the teeth of many hand files on the work-hardened layer on stainless.
4. Bahco files are out of Europe; the company is HQ’d in Sweden, but I think they’re making their files in Portugal. The couple I’ve used have been OK.
5. There is a company in Germany that made good files to whom I’ve been referred recently, “F. Dick,” makers of fine hand tools. No personal experience, I have to check them out.
Lastly, as long as we’re talking about files, I want to put in a plug for the wood rasp maker, Auriou. They make the finest wood rasps in the world, so far as I can determine. When I’m working on a gunstock, Auriou rasps save me buttloads of time and hassle – I can power through walnut very quickly, then down-shift to a fine-cutting rasp as I refine the lines on a stock. I love Auriou rasps. If you’re an experienced woodworker, once you’ve held on in your hand, you don’t want to let go.
Last point about files: There is a company that will re-sharpen hand files, Boggs Tool & File Sharpening Company. I’ve gotten to the point where I go to estate sales, and pick up the boxes of ill-treated files (the goddamn auctioneers always think that hand files should all be just tossed into a box together and allowed to rub all over each other. Morons.) The steel in these 50+ year old files is probably superior to most all the steels you can find in hand files today. I’m going to sort through the files I’ve been picking up in at sales since last summer, and send them off to Mr. Boggs and have them re-sharpened.
I’ve written up some material on files and filing techniques, in another couple months when I’m done with teaching and fire training for the spring, I should sit down and add more material and start publishing my thoughts on hand files (and then other hand tools), with sources, references, examples, etc. It’s time that someone started to put this information back into one place, where people can re-learn what used to be common knowledge 50 years ago. There are doubtless other craftsmen who would like to add their $0.02 on the matter, as gunsmiths are hardly the only craftsmen who use hand files and want a really high quality tool. Saw sharpeners, locksmiths, cabinetmakers, finish carpenters, watchmakers/clockmakers, fine woodworkers, etc – will all, I’m sure, have some information and opinions on this matter.
Thank you. This is valuable information. One of the guys on practical machinist forum mentioned the mexican Nicholson files seemed to have a hard core, and soft teeth, as you noted. Another gripe I have is the lack of flatness, and crappy corners, where the face meets the edge-lots of times there is a ridge that makes it impossible to file cleanly into a corner. The last serious rasp work I did was shaping an acoustic guitar neck- I bought a couple of oriental rasps from a luthier supply place and they cut quite well, excellent for roughing in . That is probably the closest work out there to making a gunstock- A very accurate dovetail and a lot of intersecting curved lines. Thanks for the tip on sharpening- I also have a bunch of slightly dull but excellent quality files.
Lee Valley, and Lie Nielsen are places where you can get the “better” tools that DG speaks of. You can’t go cheap at these places. Lie Nielsen has a large selection of Auriou rasps. They are nice, and about $100 each. I sure as hell hope I don’t catch my wife or kids using them without permission and supervision.
The Bahco Files are ok but you have to be careful buying Bahco tools, not all are great quality as they source from all over.
The few F Dick files I have are great, but not cheap. This is where I buy them https://koodak.com.au/collections/types?constraint=files&q=Tools+%26+Consumables
So, when the thing doesn’t fall out of the sky from structural failure, you can thank the Blogbrother for that.
Perfection is a small price to pay for continuing one’s oxygen addiction.
Continued best wishes on the project.
And please, don’t f*** it up; we’d miss the blog and all the free ice cream.
One of our morbid in-jokes is “Investigators later determined…”, which is a homage to the dry language found in NTSB accident reports. (“Investigators later determined that the pilot had consumed a significant amount of crystal meth.”)
It’s what we say when we are deciding whether some little boo-boo needs to be fixed. “Investigators later determined that the builder-owners had used AN470AD4-8 rivets when they should have used AN470AD4-9’s.”
Another little secret: when the Vans engineers decide that parts need to be assembled with 36 big f’in conventional rivets, what they are really saying is “these parts are really, really important – don’t screw around here.”
Hey mate, look after your little bro for us. There’s a lot of gimpy old ex-grunts like me, Kirk, Mr Fleetwood and others all around the world who rely on him for daily grins and important info about guns.
Or as Aesop says in fewer words, please don’t fuck it up.
He’s MY big bro – I’m the little bro. Although I am taller. But he’s older.
Wait, you get ice cream?
-John M.
It looks great, what kind of engine are you going to put on? Lycoming o320?
No, it’s a lightweight Light Sport Aircraft and it takes a 100-HP 4-cylinder 4-stroke geared Rotax 912. MTOW 1320 lbs, cruise speed ~107-110 kts.
The kits are very complete and go together well. Sometimes the pre-punched holes not only need deburring, but are slightly undersize (my guess is that their tooling wears). But they’ve never been out of place, and we’ve found maybe three things to complain about in the plans, out of about 25 sections so far which probably average five pages.
Why are you putting a rotax on it? Why not use an airplane engine?
Also, if you’re using an electric drill to remove rivets, it might explain why you are so nervous about drilling. A decent pneumatic Palm drill would probably do wonders for your confidence and capability. When the power band is smooth and the Chuck doesn’t rattle around, you’re bound to do better. AD’s have that handy little center dimple, just hit it straight and no problems.
Checking bucktails before you reach the end of the row of rivets is a good in process inspection, fwiw. But I know sometimes you just get carried away with how great you’re doing that you forget to make sure you’re doing as great as you think you are.
Not trying to give you a hard time, I love the airplane updates.
Yep,why folks say measure twice/cut once.I ,on the other hand,need to measure three times minimum it seems some days.Really start to wonder about Alzheimers ect. some days.Soon as weather breaks freezing doing a porch ceiling on a large farmers porch,built it in my head while there,luckily weather cold as started really thinking moisture content ect. and have now rebuilt it in my head,hopefully the right way this time,will keep thinking.That said,would really have to miss something to have porch come plummeting into ground at high speed,am glad you caught rivets as while I build tough a plane plummeting into porch my guess is porch would not hold up! We are both working on projects in same state so not a impossibility ,am glad you caught as your life really does depend on it,my project,not so much.
Who needs to measure? I can cut a board three times and it’ll still be too short. HaHa!
“Dry language in NTSB reports”. As someone whose been reading them for 30 years ain’t that the truth. Always surprised by that, as well as the incredibly stupid and varied ways people kill themselves (and sometimes their families) in airplanes.
I try not to keep any tools on hand. If you have tools people tend to ask you to use those tools for them. I’m way too lazy for that haha
1) #1 on the handtools. I am a graduate of the Lassen College Professional Gunsmithing program and have worked in the field, so I have experience with the power tool oh sh*t syndrome. When you’re working on something small that can’t be hosed up a file beats a Dremel any day. And yeah – my file selection is more than a 12″ bastard.
2) I just retired from 24 yrs as a Manufactirung Engineering Planner in aerospace, so your “How I Built an Airplane” saga is of interest. I know that you can go 2 (?) sizes over to fix a non-conforming hole, but it takes an Engineering Disposition written by a real engineer to go over that. What does a home builder do in this situation since you probably don’t have an engineer waiting around your garage?
Home builder/carpenter and if actually a structural member of importance takes it out and does a redo,after measuring correctly.That said,had a plan for a roof system that was way over engineered by architect once,ran past inspector who agreed,came up with new plan/had stamped by a structural engineer and we were off and running,structural engineer also said this was overbuilt on original plan and said something to the affect what was he drinking.I do make a mistake with a beam/header can either use said stuff on smaller part home/addition or it goes to a barn and gets used for something suitable latter.I can say so far have not screwed up a huge beam but made a few window headers short awhile back that luckily just used for small door openings later in project.This is why I measure a few times and hopefully do not cut it wrong three times as DMS mentioned,has not happened yet but not ruling it out!
Revgen,would also like to say I have seen things on plans,or already up have questioned and asked for more knowledgeable input,the few times I have done this about 50% of time right to be worried and reworked said issue and 50% learned everything fine,easier to do this then move forward and then find a issue.I will say the majority of work needing plans looked at/passed just fine.
Just out of curiosity, did you measure the driven rivet head to check the size? If rivets come in 1/16th inch increments, and part thicknesses vary by thousandths, and driven rivet heads have a tolerance for size (for 1/8″ rivet min. .163 dia and .050 min to .070 max thickness,) it occurs to me that certain combinations of rivets and part thicknesses may overlap -one size tending toward the big end, and one toward the small, but both within limits.
Is this possible?
https://www.vansaircraft.com/public/Specs.htm#TABLE%20III
Measuring, and thinking about measuring is important. With hindsight my utility bike would have had a longer steerer tube and higher handlebars since the fork swap also involved a flatter bar profile.
On the tooling side since I work on bicycles, a BMW motorcycle, various cars and flat pack furniture I have about a dozen 5mm Allen wrenches and almost as many 13mm wrenches and sockets. I also have a small file assortment, although my go to file is an old Stihl chainsaw depth gauge file with a piece of wood dowel glued to the tang.
One tool that might help in tight spots is a right angle drill, I have an old Makita cordless drill that is only 4″ thick and used to be very popular with car stereo installers.
I have a right-hand driver that works with the electric screwdrivers/hole-deburring-tools that we use. (Black & Decker Gyro, twist to activate).
How many home-builts have had this happen to them ONLY IT WASN”T CAUGHT?
I would suggest a small digital 4 inch beater caliper. When I’m working on the family members car collection or my bicycles or at the hardware store this is in my pocket. It’s way better than a ruler as you’re picking over the small fasteners, and with my 50 plus year old eyes, it can tell +1mm from -1mm. Fairly inexpensive for as much use or abuse as you can put it through. I feel better dropping this than a Starret Dial caliper anyway! You get pretty good converting from frac to dec too.
“Measure twice, think three times, cut once.”
The dimple on the rivet is not there for your convenience, it is a marking that denotes what material the rivet is made from. The ‘AD’ in AN470AD4-9 means it is made of 2117 alloy, it should have a center dimple. There are also ‘icebox’ rivets that have to be kept at freezing temperatures and used within 20 minutes of being removed from the freezer. Icebox rivets have a protruding nipple, IIRC. Do not use a rivet with no marking on the head, it is pure aluminium and has much less strength than an alloy rivet.
You did make a gauge out of a piece of scrap alloy to measure the width of the rivet tails, right? The tail width should be 1.5 times the shank diameter. At 1.6 diameters the tail is overworked and embrittled, at 1.7 diameters radial cracks will be visible under magnification.