Here’s a video from John Correia over at Armed Self Defense (they have a new website, so new it still has greeked text in places! No doubt they’ll fix it. On the downside, the new site has broken all the old ASP links). John talks not about the legalities of the situation, but about the tactical decision making by the defender. Most of the decisions are good, in that the defender and the bystanders didn’t get shot or dead, but as always there are lessons to be learnt from what he did wrong as well as what he did right.
Note that he got something tyro hunters are warned against: “buck fever!” In this case he didn’t have a nice eight-pointer in his sights (they always grow a few points when you miss or don’t get the shot off, don’t they?) but a guy who could have actually killed him. John has other videos where things don’t end well for the licensee or undercover cop when the criminal has the drop on him.
We never draw a pistol without hearing Paul Poole’s voice: “Bwaw-haw-haw! Dumbass dry-fired in a firefight! Bwaw-haw-haw, you’re daid!” This guy didn’t end up “daid,” but if the criminal had been less of a bozo than the usual run of his ilk, he might have been. One begins to see the appeal of safetyless Glocks. (Well, we’re on the side of the angels with a decocker-only DA/SA. And yeah, that means doing lots of controlled pair drills DA first).
At 3:28 in the video, John is explaining that Our Hero is monkeying with his safety, but also, look where he is, where his attention is, and where the robber is. Are there two robbers?! He’s face down in the mechanics of the gun — people, that old military thing of handling the gun blindfolded, assembling it inside a laundry bag, etc. is not hazing but valuable training — while the guy who pushed up the adjacent aisle is behind him at his approximate 7 o’clock. Meanwhile, one guy is in front of him, off camera to our right (defender’s left). It was a near run thing.
He did well to holster his sidearm after firing (no doubt, police are responding, and you do not want to have it in your hand when they arrive). His decision to follow the criminal towards the door was arguable, but we call it a mistake. A robber, confronted by armed force, is not coming back. He’s running, and probably in soiled pants. Remember, chasing these guys is not your problem. It’s why Officer Friendly gets the big bucks (hah). When the bad guy bolts, your mission, to protect your, your family’s and (maybe) others’ lives, is complete.
The criminal here made some really bad decisions (apart from the obvious one of being a criminal). The first is trying to take on, solo, a group of people in a broken-up space, with multiple entrances, exits, and points of cover and concealment. Probably not the first time this Wealth Redistribution Technician has done that. (In our limited experience, robbers tend to pick one kind of venue to rob — banks, groceries, sandwich shops, small-time dope dealers, convenience stores — and stick to it until their Robin Hood life gets harshed by the agents of the Sheriff of Nottingham, or wherever). Every time this brain-dead robs a place like this he’s rolling the dice that there won’t be a guy like this carrier in here — math that was encouraged by Wisconsin’s former no-carry laws — and this time the dice came up snake eyes.
This case is also interesting because this was the first defensive gun use by a licensed carrier since Wisconsin left the dwindling ranks of no-carry states a couple of years ago. (It was the last holdout, apart from Illinois (since issuing) and DC, although there are still states like New Jersey and some jurisdictions in New York, California and Massachusetts that treat may-issue as de facto no-issue).
Glock Slide Stop Failures: Another View
We were contacted by a longtime readers who is a professional firearms user after our post on the Glock slide stop failure (the original post is here).
(Larry A.) Vickers, Kyle Defoor, and Mike Pannone taught me to use the slide stop to release the slide. It is faster and LESS likely to induce a stoppage, despite what one of your commenters said.
You can hesitate and delay your slingshot of the slide. You take it off target by doing it!!
Boat guy said he does it on everything but his M9. So he trained heavily in one manual of arms when his duty weapon required another!
Slide mounted safety = Slingshot bad!!
The reason being, you can put the safety on with the over-the-top slingshot method. Pistols with slide mounted safeties include most first generation SA/DA autos, including P.38 and derivative Walthers, Smith & Wesson M39s and derivatives, Berettas and their clones, and others.
At this point he wound his body up with his left hand on his head and extended his right hand through the crook of his left elbow, asking, “How do you shake hands?”
“Huh?”
I don’t know who taught you to shake hands but their is another way.
How do you shake hands? Well, just because I can do it with a big retarded gesture does not mean it is the best way.
Slingshot bad/retarded! Slide stop good.
How fast can you hit a slide stop and engage? How fast can you slingshot the slide, hope you got it right, get back on target, and engage?
At this point, we couldn’t resist a shot, and said, “Well, I don’t need to slingshot the slide, because my P-01 has a slide release machined from steel that fits right under my thumb.” He disregarded the gibe, and stuck to Glocks.
I forget which instructor it was, but one was teaching the SEALs. He was pushing slingshot to deal with the poorly placed slide stop [on the SIG 226].
He was pushing it to the Army later and another instructor pointed out that leads to bad things with a Beretta! Had to remind him that he came up with that as a way to deal with a Sig deficiency.
But using the slide stop wears through the Glock OEM part hence the Vickers upgrade.
Interestingly enough, this guy does not run any non-Glock parts on his work Glock.
I have been using a Glock OEM extended because my job wants OEM parts.
I put Vickers on my [personal] pistols and on [a particular SF unit’s] Glock 19’s.
As for the Vickers mag release that was a fix for the too short button a Glock Gen 3. It is not needed on most of the Gen 4 pistols.
[The unit in question] even bought new trigger systems for the Glocks.
For the record, the triggers they bought were Ghost Inc’s (image right).
One cold, hard fact that lurks in the background of this whole pistol parts debate: everyone is ever seeking to get more hits, reliability, heck, electrolytes with a simple gadget. The simple gadget is ammo and range time. Anything else, and you’re one of the 99% whose pistol shoots better than you do. (We resemble that remark).
Run, Hide, Fight… and You
 In the recent Ohio State terrorist incident (you know, the one for which the press is still assiduously trying to unlock the mystery within an enigma of the attacker’s motive), campus public safety officials sent a message to all hands: Active Shooter, Run Hide Fight.
We know now that the “Active Shooter” was an error, an error that, predictably, spawned giddy glee in the gun control camp. The jihadi had a car and a machete, and followed an ISIL attack protocol we’ve seen several times in Europe this year already, but he wasn’t a shooter. However, we think that (1) the campus cops were right to send that message and (2) run, hide, fight, is good advice, and it’s probably better advice for us (licensed or authorized gun carriers) than it is for the usual defenseless collegiate population.
Let’s take those two assertions one at a time.
The Campus Cops were Right to Send, “Active Shooter, Run Hide Fight”
“But Hognose,” we can practically hear you as we write this. “There was no active shooter.” We know now that there was not, and the cops may even have had a hint that there was not. (Or not; next paragraph we’ll explain). But even if they didn’t think there was an active shooter, it was a good call for several reasons.
- It helps produce the desired defensive behavior (run, hide, fight);
- It’s a lot easier to assume that there is a shooter than to know that there is not;
- Historically, jihadi attacks have often involved coordinated attacks, whether it’s bombings or small arms attacks. The first thing to look for when you have one attacker is his confederates! If he hasn’t got any, you’re not as badly off for your false reaction than you would be if you didn’t do anything, and he was one of a cell of ten like we’ve seen in some attacks, or even a pair, a more common thing.
- And they might have thought there was an active shooter.
Why would they think that there were more shooters at large? Well, they had, apart from the room-temperature suspect, an innocent person with a gunshot wound. (This was apparently a lost round from the policeman who neutralized the suspect).
Could the campus have done some things better? Sure. But they were right to warn the campus.
“Run, Hide, Fight” is Actually a Good Protocol
A lot of armed self-defenders see themselves rushing across campus to confront an attacker in a scenario like this. We think it’s a bad idea. Better to run if you are in “escaping distance” from the threat, hide if you are invisible and unknown to the threat, and only fight if you must.
Why run? If he can already see you, moving targets are harder to hit than stationary ones. Targets further away are harder to hit than nearby ones. Opening the distance may not bring you to cover, but it does improve your odds, as does giving your assailant a target that is in relative motion, especially laterally.
Why hide? If you can access a hiding place where you are invisible and unknown to the assailant(s), you don’t ever come up in his target array.
Why fight? There’s really one best reason: if you’re cornered and must defend yourself or others’ lives. Don’t go hunting the guy; first, you moving lets him ambush you. Second, if police or a hostage rescue force strike, and you’re on the X with a gun in your hand, guess what prize you just won? Finally, if you must (or get the opportunity to) pop the guy, one of the key questions prosecutors will ask as they review the case is, “Who was the aggressor?” Don’t be that guy. It’s potentially not self-defense if you’re the one attacking.
Mental Rehearsals and “Run, Hide, Fight”
It’s important to form a mental picture of what each of these steps would look like in any place where you could potentially be attacked. We have found the drill of “mental rehearsal” worthwhile. Consider, as you go about your daily business, what would you do if this place turned into the San Berdoo social services office, or the Bataclan venue in Paris. Which way would you run? Where might you hide? Where would be the most effective place to fight?
So, as you can see, the “Run, Hide, Fight” mantra also provides you a handy mnemonic for worst-case-scenario planning and preparation, or for your “mental rehearsal.”
It’s likely that you will never face such a serious incident as the faculty, staff and students of OSU did. If you do not, the time and effort spent on preparation is a sunk cost. But if you do, nothing but time and effort spent now on preparation can avail you anything at all.
Take care out there.
Pro Tips on Zeroing a Carbine
Here’s a video from Travis Haley (hat tip, Herschel Smith). In this video, Haley applies the basic steady hold factors (the Army teaches 8, which are a little different from Haley’s) and some excellent TTPs on holding the carbine and zeroing the firearm with both iron and optical sights. (Irons first).
Here’s the next chapter of his video, where he talks about longer range zeroes. The 25/250 meter battlesight zero is falling into eclipse among gunfighters, and 200 and even 300 m zeroes are becoming more common. Haley’s preference is (given his background, not surprising) a 36m battlesight zero confirmed at 300, as is preferred in the USMC. The 25/250 and 36/300 zeroes depend on the fact that the bullet at the shorter distance is passing through the line of sight, rising relative to the LOS, and at the longer distance passing through the LOS, descending relative to it.
Here’s the Army issue “8 Steady Hold Factors” from the M16A1 era, circa 1970. Our comments in Italic type.
- LEFT ARM AND HAND: Rest rifle in “V” formed by thumb and fore- finger. Relax grip, left elbow directly under the rifle. Nowadays, we can shoot lefthanded, so today we talk about “weak” and “strong” hand, not left and right. Travis shows a more modern method of using the weak hand with the thumb over. Also, nowadays, your weak hand pulls the rifle back into the shoulder pocket to avoid putting wayward stresses on your trigger finger.
- BUTT OF STOCK IN POCKET OF SHOULDER: Place the butt of stock firmly into the pocket of the shoulder.
- GRIP OF THE RIGHT HAND:. Grip weapon firmly but not rigidly. Exert a firm rearward pressure to keep butt of stock in proper position. Clenching the strong hand hard is not necessary, because the weak hand now provides the rearward pressure.
- RIGHT ELBOW: The exact position of the right elbow varies from position to position. The right elbow is important to the maintenance of a good pocket for butt of stock.
- STOCK WELD: To obtain stock weld, lower head so that cheek contacts the same place on the stock each time you fire. If you have to “lower” your head to get a good cheek weld, your sight is mounted too low; the more common problem with AR platform rifles is that the sight is too high and it’s hard to get a consistent cheek weld. Hence all the aftermarket stocks and cheekpieces, etc. But the Steady Hold Factor’s point is solid: your connection of face to rifle stock needs to be solid, and most of all consistent: same cheek weld, exactly, every time.
- BREATHING: Take a normal breath, let part of it out, then hold remainder by locking throat. DO NOT ATTEMPT TO HOLD BREATH FOR MORE THAN TEN SECONDS. It seems to help beginners to tell them, take a breath and let it half way out.
- RELAXATION: Learn to relax as much as possible in any firing position. If a firer finds that he cannot relax, the whole position should be adjusted. “Relax” isn’t really the way we’d put it. You want to be loose and not tense, but not sloppy or slow. Too much tension does make your body (and rifle) shake. A sure sign of a novice is a tightly clenched jaw or grinding teeth!
- TRIGGER CONTROL: Press the trigger straight to the rear with a uniform motion so that the sights are not disarranged. The trigger finger should be placed on the trigger so that there is no contact between the finger and the side of the pistol grip. Smoothness on the trigger press is devoutly to be wished. Ideally, you want to tighten the trigger when the sights are on target, stop pressing and hold if they move, and tighten again. If the firing of the weapon surprises you, that’s okay, and a lot better than a jerked trigger.
Some points on zeroes:
- You absolutely must be able to fire the rifle consistently to zero it. Lots of trouble is caused by “social promotion” of guys that haven’t zeroed from the zero range to the rifle qualification range. Resist that promotion; master the tight group first, and the rest all falls into line.
- The Army love to have you take your previous zero off and start with a “mechanical zero.” This is stupid; don’t do it. Mechanical zero, which centers the sights, is like boresighting an optic; you use it when your old zero is lost or the specific serial number gun is new to you.
- If you confirm a zero, you’re done zeroing.
- The Army zeroes with a three round group. This is… you guessed it… stupid. Five rounds, please.
- Most Army units have “that guy” who can’t zero, or several of ’em, and often the problem is “those guys” who are coaching “that guy” can’t teach, can’t coach, and usually can’t shoot either.
- Shooting is not rocket surgery. Get good instruction and follow it and you will get better. Most people who suck at shooting assume they know it all. In the Army, it’s a truism that women learn to shoot better in basic than men do. Why? Our guess is that they don’t come all bound up with a male ego that already “knows it all” with respect to shooting.
- We have learned something from every instructor who’s ever taught us.
Artifact of a Training Dream
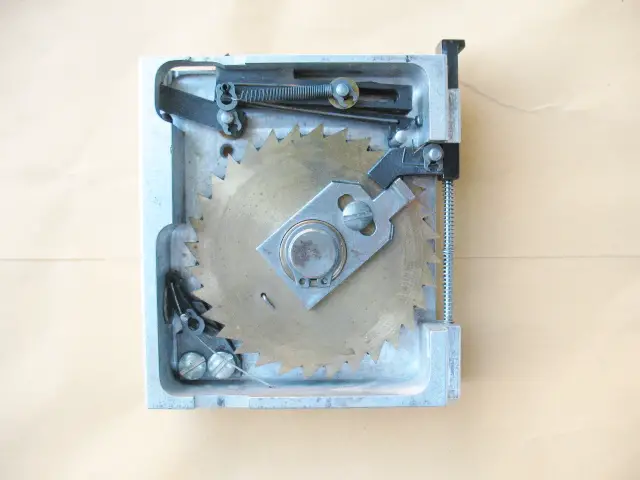
The mystery was the identity of this gadget…
Simulators have always been the Next Big Thing ever since Ed Link conned the Army Air Corps into believing that they could teach instrument flying on the ground. (After a series of planes came tumbling out of overcasts in pieces, the ferry command that was in charge of delivering aircraft and crews to Great Britain for the World War stopped trusting pilots with an Air Corps instrument card, and started retraining them). As the ferry command found, a simulator could be a good adjunct for live training, but it was a poor substitute.
In the 1970s, the Army followed the siren song of simulation and developed a training device called the Weaponeer. The dream was: rifle training without rifles. Or ammunition, or ranges; and it worked, to a degree — like that 1940 Link simulator. Weaponeer was a very robust arcade game built around a modified rifle (then, an M16A1) that tried to simulate the experience of firing a rifle. It actually “kicked” with a fairly accurate recoil. It also simulated the accuracy of the weapon pretty well, its cycling, and even magazine changes with bolt lockback on an empty mag. The gadget shown above was inserted in a modified magazine shell and could be “loaded” with zero to thirty “rounds.”
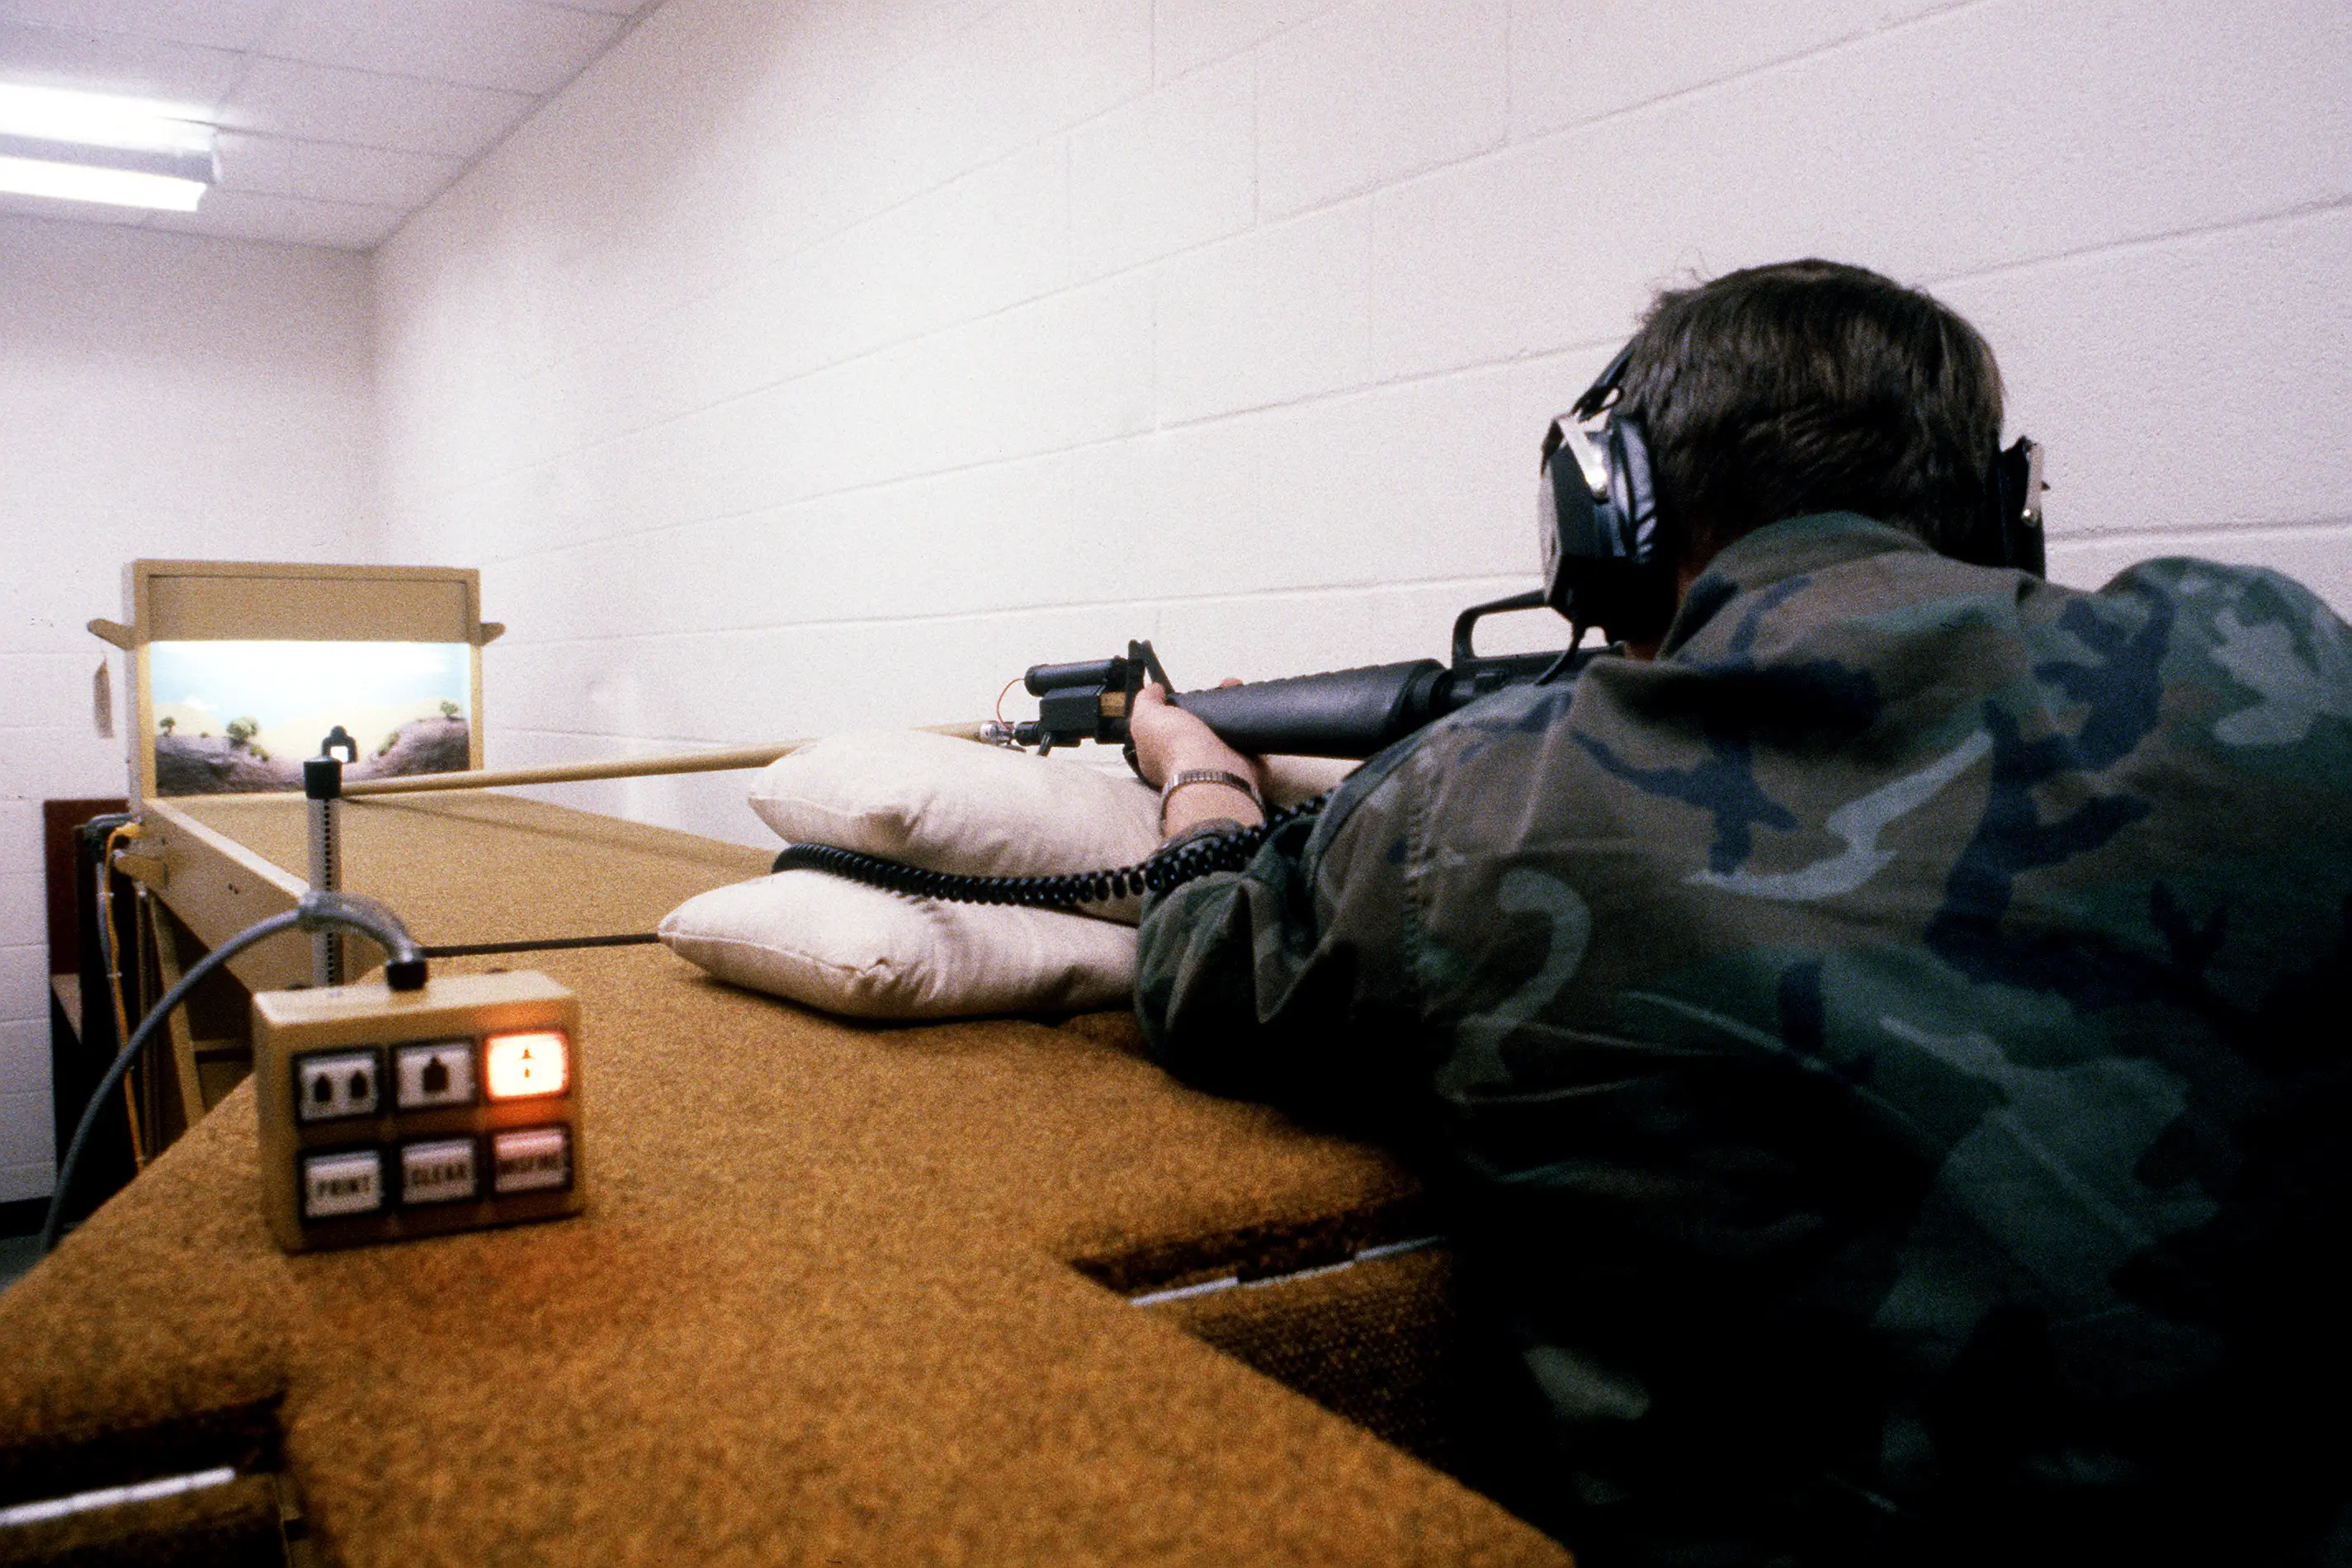
A soldier uses the Weaponeer marksmanship training system. US Army photo from Fort Devens, MA, 1990.
Weaponeer was invented and initially debugged by 1973, and widely adopted and fielded in the Army by the early and mid 1980s. In some places it worked well (for instance, as a mechanism for instructors to observe green trainees that were struggling with basic rifle marksmanship, and break them of bad habits, or for members of an element that needed to maintain proficiency in a non-permissive overseas environment in which they could not go to military ranges). In other situations it did not work as well. Some service support units, never fond of going out to messy rifle ranges, used it to “qualify” in shirtsleeve conditions.
It was not extensively exported. These Kuwaitis being trained by an American sergeant are among the few foreigners to have used the system.
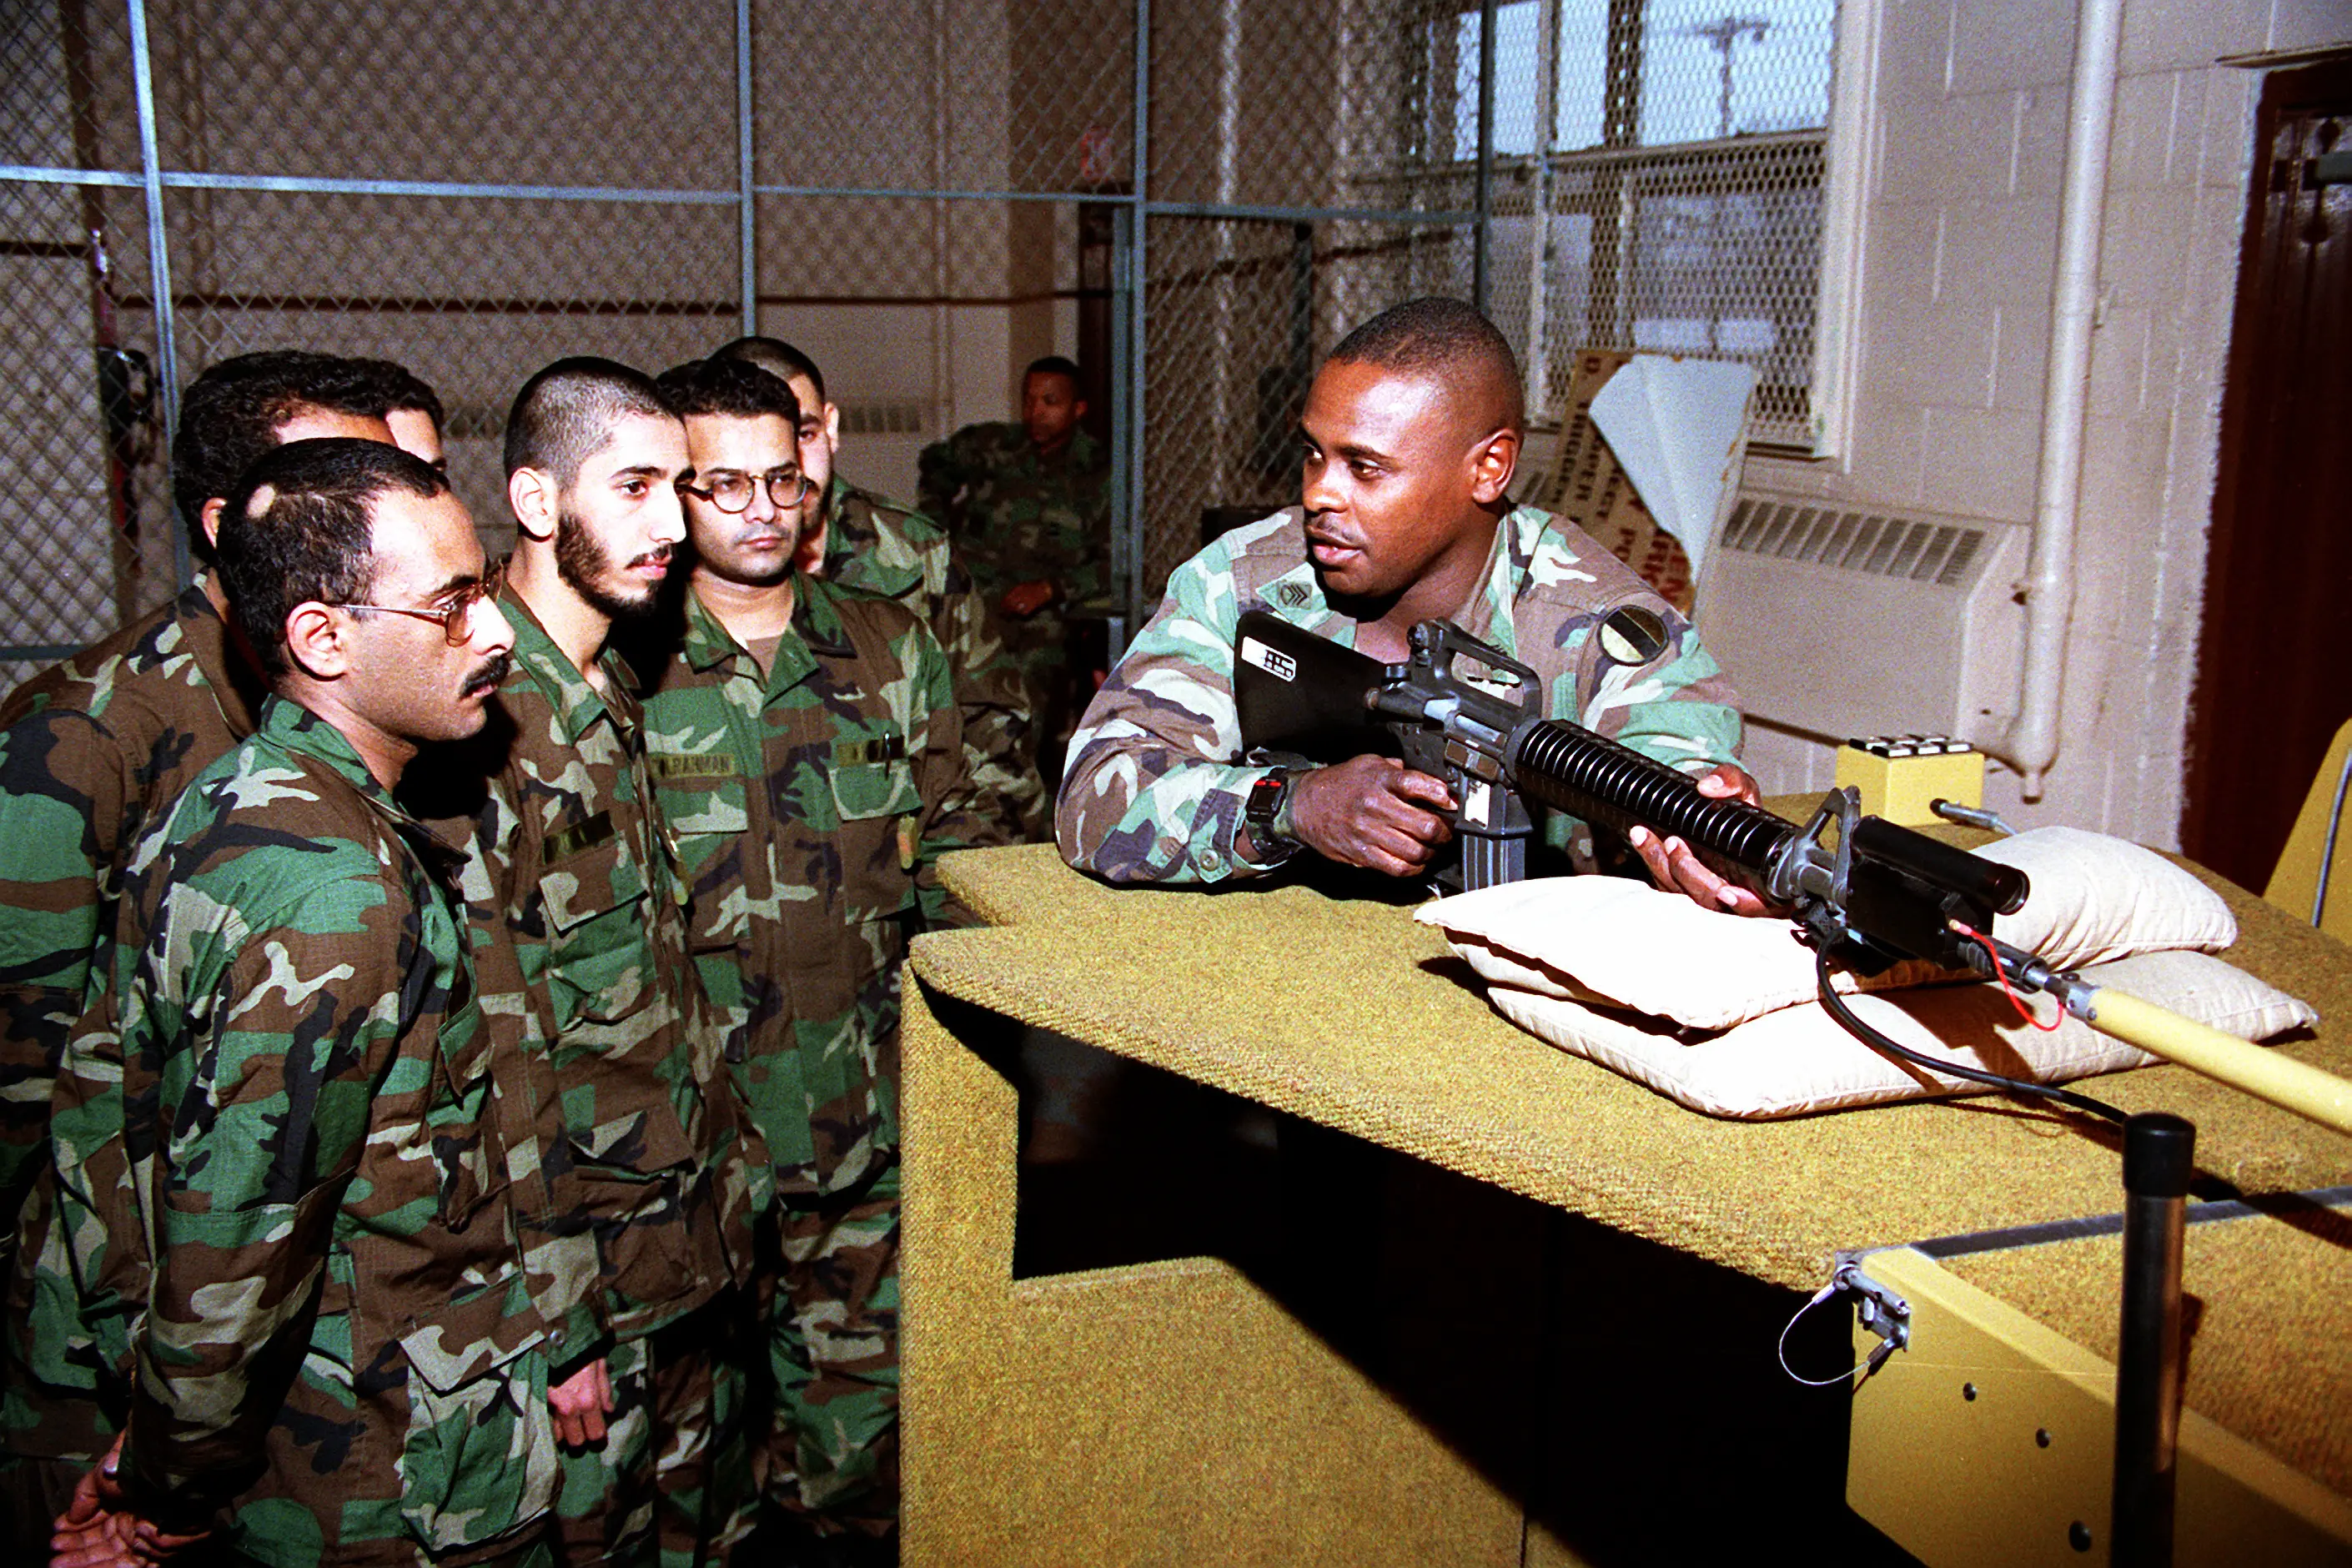
An instructor explains the Weaponeer Marksmanship Training System to Kuwaiti soldiers during a marksmanship course. The soldiers are being trained in combat techniques in preparation for conflict with Iraqi forces presently occupying Kuwait. Fort Dix, NJ: 8 Jan 91 via the National Archives.
In any event, the artifact at the top of the post turned up recently, and with it being vaguely M16-magazine sized and shaped, its new owner turned to the ARFCOM Retro Forum for answers. He got them, including these detailed pictures that explain how the magazine insert works. Read The Whole Thread™, which also has more pictures.
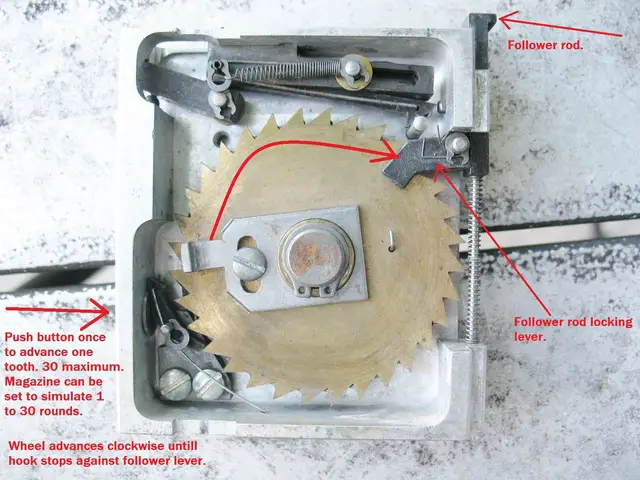
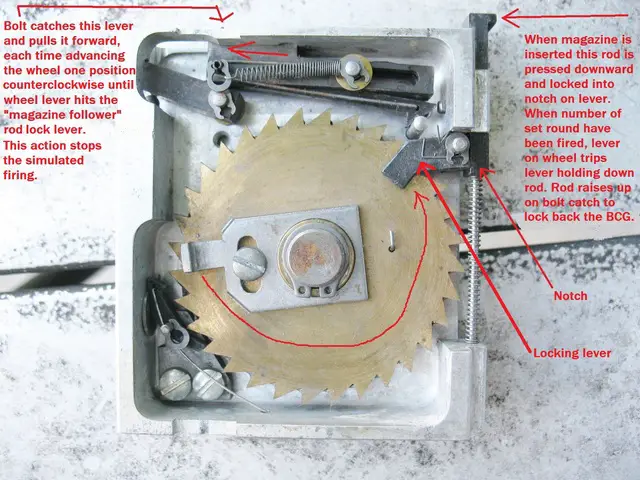
An appendix to the marksmanship training manual (Appendix A-6 to FM 3-22.9) gives more information.
The Weaponeer is an effective rifle marksmanship-training device that simulates the live firing of the M16-series rifle. The system can be used for developing and sustaining marksmanship skills, diagnosing and correcting problems, and assessing basic skills.
Characteristics. The Weaponeer operates on 110 to 130 volts AC, 10 amperes, 50 or 60 Hz, grounded electrical power. (A stand-alone voltage transformer is provided for overseas units.) The recommended training area for the Weaponeer is 10 by 23 by 8 feet. The operational temperature range is 40 degrees to 100 degrees Fahrenheit. The Weaponeer must be protected from the elements, and should not be subjected to excessive vibration, high dust levels, or condensing humidity. The M16A1/A2 attached to the Weaponeer is demilitarized and does not require the usual weapon security.
The rifle, with the exception of smoke and cartridge ejection, operates normally, and has the same weight and balance as the standard weapon. An infrared aiming sensor simulates round trajectory and hit point to an accuracy of better than one-minute-of-angle. The recoil rod that attaches at the muzzle end of the rifle simulates recoil. Recoil is provided in both semiautomatic and automatic modes of fire, and is adjustable from no-net force to 30 percent more than that of a live M16. Sound is provided through headphones and is adjustable from 115 to 135 decibels. Special magazines are used. One magazine simulates a continuous load; the other (used to train rapid magazine change) can be loaded with 1 to 30 simulated rounds. Selectable misfire can be used to detect gun shyness and drill immediate action. The front and rear sights are zeroed the same as standard rifles.
As you can see, that describes the magazine insert that the ARFCOM member got hold of.
The Weaponeer range can be raised or lowered to accommodate all firing positions. The target assembly contains four targets: a scaled 25-meter zero target and three pop-up targets are standard. E-type and F-type silhouettes at ranges from 75 meters can be used on the Weaponeer. Known-distance and various other types of targets can be used and be displayed in fixed or random sequences. Target exposure times may be set to unlimited or from 1 to 30 seconds. The fall-when-hit mode can be selected with the KILL button.
The operator’s console contains the system control buttons, graphics printer, and video feedback monitor. The back of the console has counters that total rounds and hours, and a storage bin for storing magazines, printer paper and ribbon, headphones, two wrenches for assembling the Weaponeer, and a small allen wrench for aligning the rifle sensor. A remote control, which attaches to the back of the console, enables a trainer or firer to operate select functions away from the console.
Feedback. The Weaponeer provides feedback to help trainers to teach and soldiers to learn marksmanship skills.
- Fall-When-Hit Mode. Lighting the KILL button enables the fall-when-hit mode. When the button is activated, targets fall when hit. This feedback provides the same hit or miss information as a train-fire (RETS) range.
- Real-Time Aiming Point Display. When a firer aims on or near a target, his aiming point relative to the target is continuously displayed on the video screen. The aiming point display allows the trainer to teach and verify aiming techniques, and to continuously monitor the firer’s steadiness, techniques, time on target, trigger squeeze, and recovery from recoil.
- Immediate-Shot-Impact Display. When a shot is fired, its impact relative to the target is immediately displayed on the video screen as a blinking white dot (Figure A-12, left target).
Fig A-12: Replay of shot.
- Replay. After a shot is fired, a real-rate display of how the firer engaged the target can be replayed on the video screen.
- The target to the right in Figure A-12 shows the type of information that can be replayed on the video screen after a series of shots are fired. To show the sequence, the dots have been numbered.
- To show a replay, the firer first selects the shot he wishes to replay by operating the EACH SHOT button. Then he presses the REPLAY button. Some Weaponeers record and store replays for just the first three shots.
- Shot Groups. The impact location of up to 32 shots is automatically stored in the Weaponeer memory and displayed on the video screen. Each impact is indicated by a white dot, which blinks when indicating the last shot. All 32 shots can be fired and displayed on a single target, or split among a combination of targets. The CLEAR button erases all shots from the Weaponeer memory
- Printer. A hard-copy printer is provided for postfiring analysis, for firer progress tracking, and for record keeping. Pressing the PRINT button causes the target displayed on the video to print. (Sample printouts are shown in Figure A-13.) Some Weaponeers can print the three pop-up targets at the same time by holding in the REPLAY button and pressing the PRINT button.
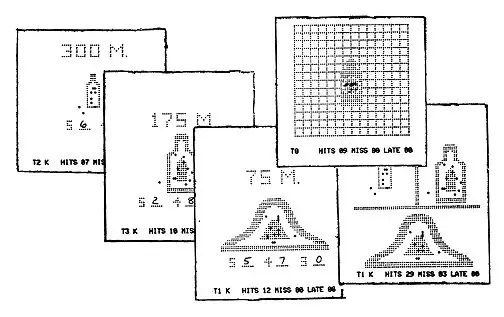
Figure A-13: Weaponeer printouts.
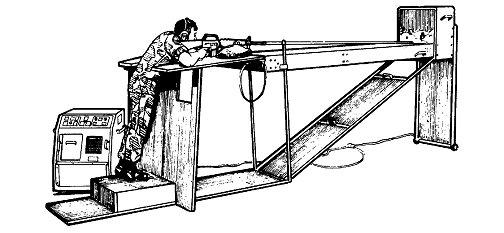
Use of the Weaponeer. In BRM, the Weaponeer is used to evaluate the firer’s ability to apply the four fundamentals. It is used throughout the program to help diagnose and remediate problems. In the unit, the Weaponeer should be used much like it is used in BRM. Concurrent use of the Weaponeer at the rifle range provides valuable remedial training.
- The preferred training configuration for the Weaponeer is shown in Figure A-14. One trainer operates the system while three to six soldiers observe the training. Soldiers should rotate, each receiving several short turns on the system. Where high throughput is required, consolidation of available Weaponeers may be considered.
Figure A-14: Weaponeer training configuration.
- When training soldiers on the Weaponeer:
- Proceed at a relaxed pace, and emphasize accuracy before speed.
- If possible, train with small groups, allowing each soldier several 10- to 15-minute turns on the device.
- For remedial training, try to relax the soldier. A nervous soldier will have trouble learning and gaining confidence in his marksmanship skills. For sustainment training, encourage competition between individuals or units.
- In Figure A-14, five soldiers are being trained. One is firing and four are observing, awaiting their turns on the device. The video screen is carefully positioned just outside the vision of the firer, but the firer can easily turn his head to see replays and hit points. The position of the trainer is also important so he can see both the firer and video screen. This is a good position for detecting and correcting firing faults. When the firer is in the standing supported firing position, the console should be placed on a table so the trainer can see the video screen above the firer’s rifle (Figure A-15). Observers can see the targets, firer, and video screen and learn procedures that speed up training and help avoid firing faults.
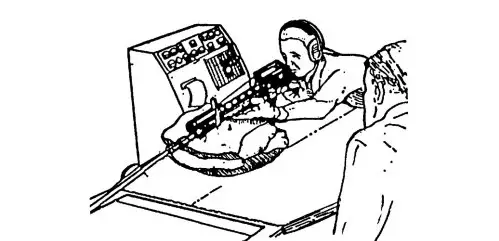
Figure A-15: Training arrangement (supported firing position).
Unfortunately, the Army does not appear to have released Weaponeer devices as surplus, but has destroyed them instead. It would be a fun thing to have in your man cave, if you could keep it working. For a while in the late 1980s, dozens of these things were dead in units all around the world.
Without a whole Weaponeer, the device the original poster has is of no utility, but it’s an interesting artifact.
Here is some further information on Weaponeer.
- Weaponeer was supposed to be replaced by a system called EST 2000 (which also was intended to replace a buggy computer-based system that ran on a, we are not making this up, Commodore 64).
Russian Marksmanship Card, circa 1945
Here’s a Soviet Marksmanship Card that appears to be from the Second World War era (Great Patriotic War to the Russians). Because it is posted on LiveJournal, which is anti-gun, you must click past an “over 18 warning” to follow the link (it is on an interesting Russian blog); that feature breaks Google Translate, so you have to read Russian to read the blog (or the post).
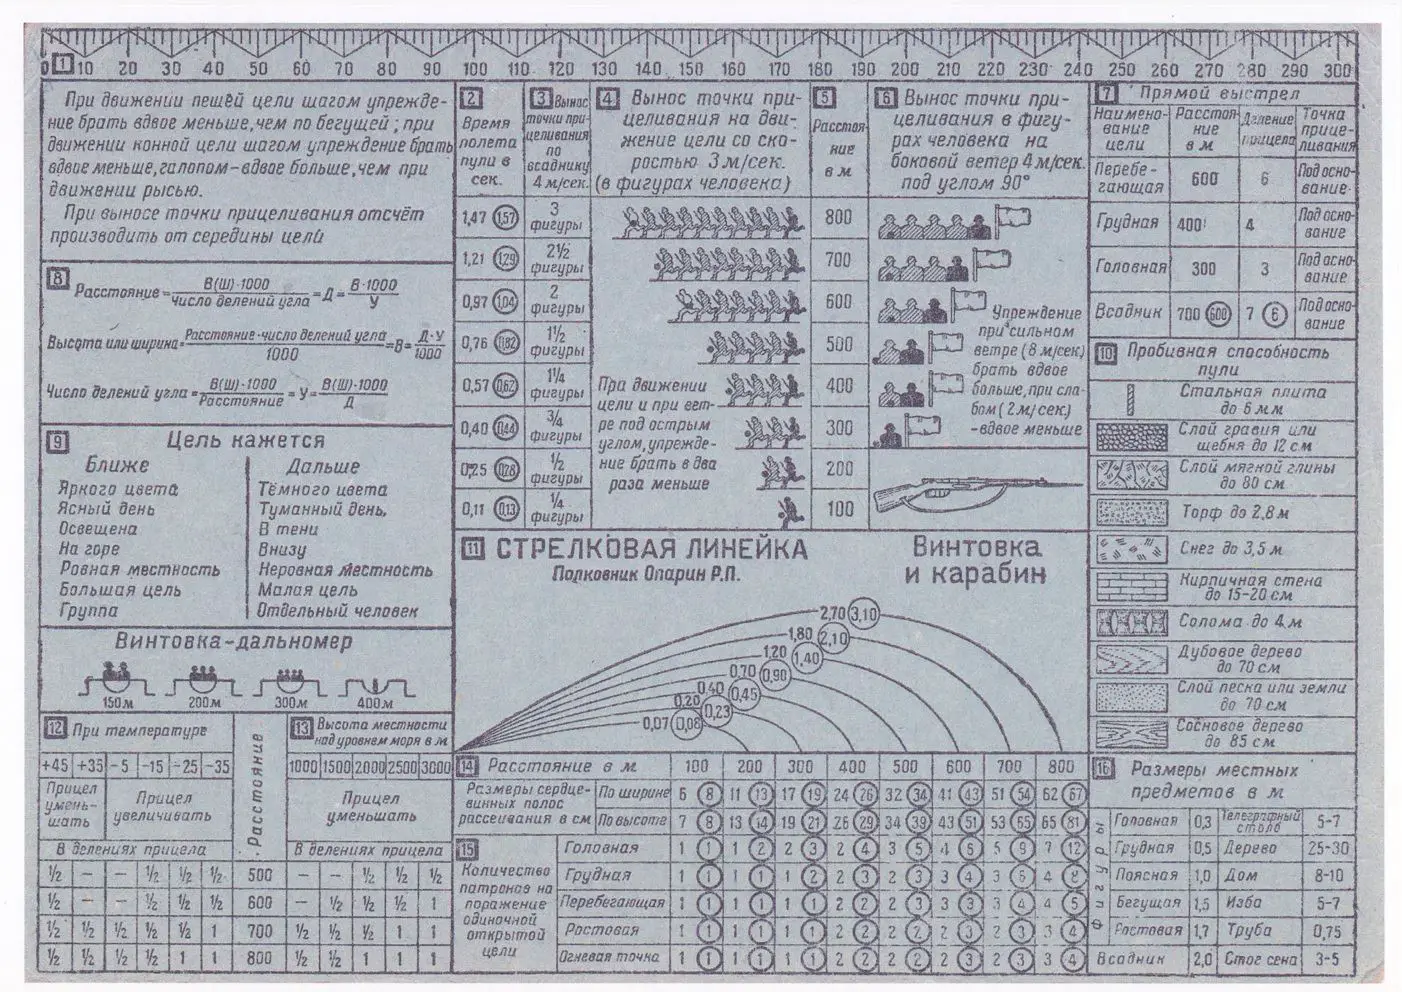
That’s not as disabling as it might be, because you have to read Russian to read the card. That’s a pity, especially for Mosin-Nagant fans, because the card is densely packed with information on how to use this rifle. We don’t know how widely these were disseminated to Soviet troops (or what was on the back of them — there must have been something?), but a lot of thought and ballistic knowledge went into the card’s creation. The soldier who mastered this card, and better yet memorized much of its contents, would truly be a master of his Mosin-Nagant rifle or carbine.
The card contains 16 numbered items, some of which are tabled together. Item 1 is a simple ruler along the top edge of the card, which is how we know for sure this was meant as a pocket card and not as a wall poster.
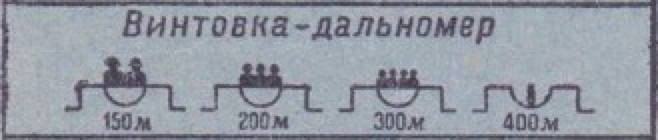
For example, this diagram, which is part of Item 9 on range estimation, comes after a list telling you what you are likely to see near and at distance. It lets you use the rear sight notch as a range finder, given average size Nazis. (The caption says “rifle-rangefinder”). Did you know your 91/30 could do that?
The targets appear to have British helmets, which is not unusual in interwar Soviet manuals, but this document “feels like” it was produced towards the end of the World War, probably in 1945.
Most rifles can be used this way. For instance, the front sight blade of an M16A1 or A2 is the width of a man’s chest (or an E-type silhouette target) at exactly 175 meters. If the manufacturer of your iron-sighted rifle did not provide such a table for you, you can make your own with known distances (or a laser rangefinder) and a man-sized silhouette.
Next let’s estimate lead on running-man targets, and windage in a stiff wind (4 m/sec), at common combat ranges. Soviet marksmanship trainers were quite ambitious, inculcating confidence in the accuracy of the service rifle to 800 meters.
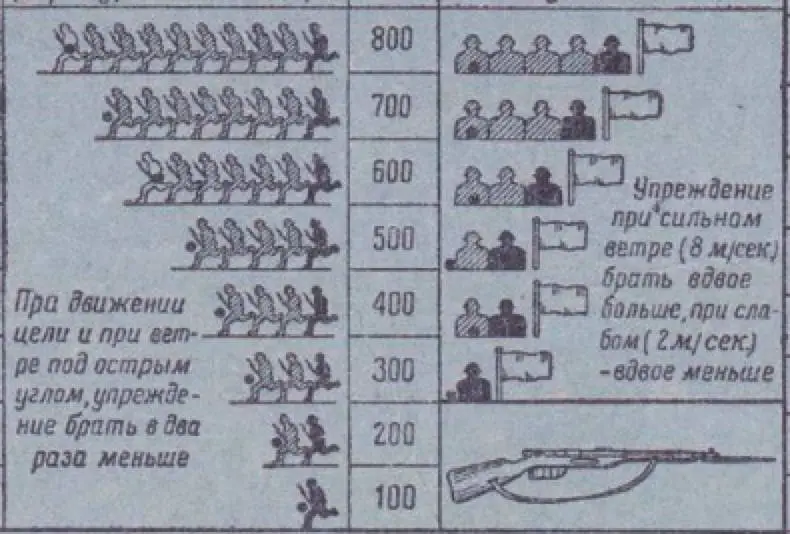 These calculations are based, of course, in the time of flight of the bullet, and if you noted, we snipped out only part of the table, which comprises Items 2-6 of the card (the image above is the graphic part, minus explanatory text, of Items 4-6. Expanding the image to include the legends and Items 2 and 3 on the left we see that Item 2 is the actual time of flight, in seconds and hundredths of seconds. The open numbers are for the rifle, and the circled numbers for the (presumably, M1944) carbine, which is a convention honored throughout the card.

Item 3 is windage in a 4 m/sec wind, measured in body-widths (figury); part 4 lead on a 3m/sec running man, and part 6 an illustration of what they mean by the windage in Part 3, assuming a 90º crosswind. The text block there tells you to double the windage in double the wind, and halve it in half. (Hey, it’s a card for Army privates, least common denominator).
Item 10 is a penetration table, running from Steel Plate (6mm) to Soft Wood (85 cm) in no particular order. Some items on this list would not be much use to Mosin users in Cuba or Vietnam, like Snow (3.5 meters), but were certainly important to anyone fighting for the soil of Russia itself.

While the Mosin rifle is long obsolete (even Russian honor guards usually carry the successor SKS), modern 7.62 x 54 mm ammunition is remarkably similar in ballistics to this wartime load; only the quality control has changed (it’s better now). It will still take about 1.47 seconds for your round to go 800 meters, and the amount you’ll need to adjust for wind or lead a running target still complies with Newton’s Laws in the same exact way.
Just because something is old, doesn’t mean the men who invented and applied it were primitive. As this illustrates, they probably have a lot to teach us!
When Stopping on Patrol
No one patrol consists of a straight-ahead walk with no pauses or stops. Sometimes the stop is momentary, to organize a crossing of a danger area or mount a leaders’ recon. (A well trained unit has these procedures embedded in SOP and there’s no thinking, planning, or orders required, while the patrol is underway). Sometimes the stop is more deliberate — you are nearing an objective, or stopping to rest, or reorganize, or stopping overnight.
If you are stopping deliberately, by US doctrine you are “establishing a patrol base.” This PB can be simple and momentary, or it can endure for some time and evolve into a mission support site, advanced operations base, combat outpost, or forward operations base. (Although doctrine says it’s not a patrol base if you hold it more than 24 hours). But we’ll confine ourselves to the initial establishment of the patrol in the halt as a patrol base.
Selecting the Patrol Base
There’s no way to learn to select a patrol base from a book, or a blog post. You need to think about a position that is at once defensible, but at the same time not so obvious as to beg for recon by fire. It should provide observation and fields of fire back in the direction you came from (in case you’re being tracked), and in the most probable direction of the enemy. It should not be athwart or adjacent to a high-speed avenue of approach.
It should be as concealed from the likely enemy observation means as possible, with enough room in concealment for everybody in the patrol, but they should still be very compact. (Again, how much you tighten up in the patrol base depends on the threat posture. Big danger is enemy recon seeing you? Get small. Big danger is enemy artillery or air? Get some space between your guys).
In short, the patrol base location is any place where your patrol can hide for a bit, without it being obvious or logical to an enemy that someone might be hiding there.
Occupying the Patrol Base
Book doctrine conflicts, at times, with practical doctrine on this. The book says you always secure the patrol base prior to occupying it, for example, by observing it and covering it with fire, and conducting a recon around the area. With small patrols, it may be most practical to secure the base by occupation — in other words, walk right in. Then conduct your perimeter recon.
Pass by the tentative patrol base location and hook back into it. Some call this a fishook or buttonhook maneuver. Why do you do this? If an enemy is following you, you want to drag him past your PB’s fields of observation and fire, mentioned above, which are set up to ambush your own backtrail. When you branch off to go into the patrol base location, at least temporarily place a listening post/observation post at the branch post (you will likely reposition the LP/OP later).
As the point man moves into the base, direction of movement is called 12 o’clock. The patrol leader drops off at 6 and then describes where in the patrol base perimeter each subordinate element (each guy, in a squad patrol; each platoon, in a company patrol) will be positioned. Each crew-served weapon is positioned individually. (Crew-served weapons guard the most probable and fastest routes of enemy approach). The PL walks (or crawls) the perimeter and assigns sectors to crew-serveds and subordinate leaders, who assign sectors to their subordinates in turn. The PL also assigns an initial rally point. Initially, the patrol remains on 100% security and treats the PB as a listening/security halt.
The headquarters of the patrol (in a small patrol base, this may just be one or two men) is positioned at the geometric center of the patrol base, which is usually circular or elliptic (it may resemble a football, in planform).
The perimeter recon ensures that you didn’t put your six-man recon element downhill from a sleeping enemy regiment (laugh if you want, it has really happened!) and ensures there isn’t some threat, obstacle, or high-speed avenue of approach that was just out of sight prior to occupation. The PL needs to be ready to pack up (figuratively; no one unpacks, and the team remains at 100% security, while the recon is out) and move if the recon brings back bad news.
Ensconcing these procedures in a set of SOPs known to all hands has many benefits, including prevented wasted time standing around disseminating orders, increasing the speed of execution, and enabling rehearsed, building-block activities when the men are tired and fearful. (A little fear is a good thing, forward of friendly lines. Not enough to paralyze; just enough to heighten perceptions and put you on edge).
Patrol Base Activities
The most important patrol base activity is security. After an initial period of 100% security, the PL may allow a reduction in security. While this is usually expressed as a percentage, it’s really a fraction. Normally, forward of friendly lines, security levels below 50% must be approached with caution. Very small units in a clandestine patrol base (4-6 men, see below) can go to just one man on watch, once security is assured, because that one man can rouse the others rapidly and silently.
Apart from security, always priority one, the PL assigns priorities of work. The usual priority is:
- Security
- Equipment maintenance
- Foot maintenance
- Mission planning (selected personnel)
- Water (the recon teams may have found a source)
- Food & sanitation
- Rest
These priorities are not always addressed in every patrol base. They can also be addressed in depth in standard operating procedures, which minimizes time spent giving, receiving and reading back orders that are already understood.
When anyone is outside the perimeter, whether it’s your initial recon team or Joe Tentpeg seeking a tree to hang from whilst relieving himself, everyone in the perimeter must know who is out and where he is expected to be. Failure on this measure gets friendlies shot.
Sanitizing and Clearing the Patrol Base
When the patrol departs, nothing should be left behind — no equipment, no trash, no disturbance of the vegetation — to indicate that it was ever there.
Before you leave the patrol base, set a new rally point by map recon and confirm it as you move. Leave the patrol base directly, do not return on your backtrail at all. Once you have left the patrol base, never return to it. A well-resourced enemy, having discovered that you used the site, will place human or technical surveillance on the site.
Patrol Base Variations
Very small units on longer missions can set up a clandestine patrol base. In this case, a small element — a recon patrol or a very small special-purpose combat patrol like a sniper team plus security — can establish a clandestine or passive patrol base, in which all the men are tightly together, within touch, and only one remains on watch. The goal is to minimize movement and size and therefore the signature of the bedded-down patrol.
While Army doctrine sometimes teaches a different approach to the last hole-up before a combat patrol hits its objective, we have found that treating this halt, called an Objective Rally Point in Army doctrinal terminology, just like a patrol base simplifies training without compromising security.
For More Information
Here’s a link to one of the many editions of the Ranger Handbook, a generally good source of patrolling doctrine.
https://www.atu.edu/rotc/docs/3_21-76_Ranger_HB.pdf
The Listening / Security Halt
Getting ready. You don’t skyline yourselves like this forward of the lines.
The most annoying person in the world is the write-only device. You know that guy: he never shuts up, yammering on and on, and never stopping to listen, only to take a breath. As you might expect, that habit which makes everyone want to kill him in a peacetime classroom or office, makes it easy for the enemy to literally kill him in combat.
There is much to be said about stealth and silence. The first thing that we will say is this: truly silent motion across terrain is not possible. It is an ideal for which you must strive, but even Mark Twain recognized it as nothing but a literary convention, when he was beating the defenseless James Fenimore Cooper senseless in a battle of wits:
Another stage-property that he pulled out of his box pretty frequently was the broken twig. He prized his broken twig above all the rest of his effects, and worked it the hardest. It is a restful chapter in any book of his when somebody doesn’t step on a dry twig and alarm all the reds and whites for two hundred yards around. Every time a Cooper person is in peril, and absolute silence is worth four dollars a minute, he is sure to step on a dry twig. There may be a hundred other handier things to step on, but that wouldn’t satisfy Cooper. Cooper requires him to turn out and find a dry twig; and if he can’t do it, go and borrow one. In fact, the Leatherstocking Series ought to have been called the Broken Twig Series.
It was always a Cooper white man who broke the twig, because Indians were born to patient stealth, at least in his universe. (Cooper, one must remember, was no frontiersman, but a cashiered Naval Academy midshipman). The Indian, in fact, was no more capable of silent movement than a ninja, an SF soldier, or you.
It was a crushing disappointment to learn that we would not, in SFQC, learn the Indian ninja art of silent walking on dry oak leaves. Instead, however, we learned something more practically useful: how to be quieter than the other guy, and as quiet as we needed to be.
If silent movement is not possible — and it isn’t, if your enemy can’t hear you, his dogs, with their superhuman hearing, can — then moving stealthily at night requires several things:
- Masking local noise with background noise;
- Altering the kinds of noise to attenuate sound travel; and,
- Periodic listening halts.

Not hard enough? Try it in MOPP.
The first two are fairly obvious: you can move much more rapidly without giving yourself away when a train is passing by, and high-pitched sounds travel poorly. (You do need to bear in mind that sound travels differently in different atmospheric conditions). The most complicated of those three principles of night movement to apply is the periodic listening halt.
Immediately after inserting, assembly, or crossing a danger area (of which more in some subsequent article), the patrol or team must conduct an initial listening security halt. While the details of the halt may vary, something like this works:
- Freeze in place.
- Remain there for five full minutes.
- Maintain 360º security.
- Actively listen the whole time.
- After five minutes, make a decision: move, or continue listening?
Why five minutes? You can change that time if you like, but it’s a good minimum because it’s quite a long time to be frozen in one place. Even a patient enemy, who stops when you do, will move and give his existence and position away before five minutes is up.
Active listening? That means concentrating on listening. You’re not only listening for the enemy, but also to develop a mental picture of what normal night sounds in your location are like. What are they like immediately when you stop? If you have been halted for a time, are there animal noises that come back (and that presumably stopped while you were moving)? Knowing this gives you an edge in the woods, compared to someone who doesn’t.
After the initial halt, the element leader must have a way to silently signal the element to begin moving again. If there is sufficient illumination, hand and arm signals may be effective; if not, touch signals should be used. Only in the most extreme case should a command be verbalized, and then, it should be whispered (remember, a higher-pitched whisper will travel much more poorly than a normal-pitched vocalized word — which is a good thing in a night full of hostiles).
It goes without saying that all these modes of command and control, and the listening security halts themselves, must be practiced in controlled conditions in garrison before attempting them in the face of an armed enemy. Night combat patrol operations are at the far end of a long crawl-walk-run pipeline; they’re the Boston Marathon of crawl-walk-run.
Animal and bird sounds make both effective stealth command and control means, and also excellent “cover” if you inadvertently make a sound in the possible presence of the enemy. Do a Leatherstocking and break a twig, or snap back a branch? The risk of exposure may be mitigated, if you can fake the snort of a deer or porcine species native to the area.
Once the element is on the move, further listening security halts should be executed at relatively short but variable periods. You can set these by distance or by time; it’s also helpful to be cognizant of terrain. If you have just passed through some stuff that was impossible to be truly quiet in, like dense mountain laurel or the dry leaves of an oak forest in winter, a listening security halt on the far side should be able to reassure you about the prospect of being tracked or tailed. As in all patrol technique, principles are iron but the means of serving those principles are best mixed up so as not to simplify the enemy’s counterpatrol planning.
Don’t be the foot-shufflin’, twig-snappin’, noise-makin’ equivalent of the yammering guy in the first paragraph. On patrol, the silent man comes home; the guy who loves the sound of his own noise dies from it.
Safety When Undercover
![]() We have harped on this before, but not everybody reads WeaponsMan.com, and it happened again — a plainclothes agent (a Fed from Homeland Security Investigations (HSI), the investigations arm of ICE), joined local cops and a smorgasbord of whatever LEOs were handy in responding to a reported active shooter event at a school in Texas. And he was shot and wounded by a US Marshal. CNN (warning, loud autoplay ads):
We have harped on this before, but not everybody reads WeaponsMan.com, and it happened again — a plainclothes agent (a Fed from Homeland Security Investigations (HSI), the investigations arm of ICE), joined local cops and a smorgasbord of whatever LEOs were handy in responding to a reported active shooter event at a school in Texas. And he was shot and wounded by a US Marshal. CNN (warning, loud autoplay ads):
In the confusion that followed, numerous law enforcement officers rushed to the scene and a US marshal accidentally shot a Homeland Security agent, Brewster County Sheriff Ronny Dodson said.
Dodson said the agent was in stable condition; he didn’t release the condition of the wounded student. Her injuries didn’t appear to be life-threatening, the sheriff said.
Thing is, by that time it wasn’t an active shooter event any more. One 14-year-old girl shot and wounded another female student, then killed herself. By the time the first cop got on the scene — a deputy who’d been passing by — the shooting was over. Or it would have been over, if not for one Fed blasting another, to the embarrassment of all (and the pain of the wounded dude).
As to the girl-on-girl shooting, so far it beats law enforcement with a stick.
Dodson said the student who died moved about six months ago to Alpine, a community of 6,500 people roughly 200 miles southeast of El Paso. Dodson didn’t identify her or provide a motive but said her family is cooperating.
Mean Girls was not a how-to manual, kids.
Since Columbine, when the massacre rolled on while the cops were running their procedures outside, there’s a new dynamic in active shooter response: everybody goes in, balls to the wall, right down the middle. Fine and good, but consider these things:
- There’s little (usually, no) interagency commonality in equipment, uniforms, or — most important — training.
- As an armed undercover in the middle of a law enforcement all-call, you might as well be wearing a deer suit on the first day of the rifle season.
- As an individual, think about your IFF (Identification Friend or Foe). Raid jacket, at least.
- If you have a regional interagency task force, do a little planning now, long before you have to deal with one of the trigger-happy crumbs. For instance, declare a single a distinctive and unmistakeable TF identifying badge or mark, and get the news around to all jurisdictions, but keep the details LE Confidential.
- Sneaking through the reported active-shooter zone is a really bad idea if you’re not practically lighthousing “cop!”
- Remember that jumpy cops even shoot other uniformed cops. Not just cops, either. Soldiers shoot friendlies all the time, despite always wearing uniforms and pursuing all kinds of control measures.
- As an individual, the safest thing to do is wait and stack up with the locals when they go in.
- You will never have perfect information. Chaos and Confusion are the handmaidens of combat.
When Army elements used to work the indoor HR/CT mission hard, we had certain control measures we used, most of which are no secret. One key approach was to get and keep the hostage taker talking to the negotiators while the assault leaders planned the takedown. The first thing they did was plan a hasty takedown, which you hoped not to use, but would initiate if the hostage takers started harming hostages.
But the hasty takedown would always come from one direction, in one team, under one command. You might play multiple-entry-points or roof team / ground team in the deliberate assault, but in a hasty assault you kept everyone together. This kept you from killing hostages and each other.
The absence of unity of command in a law enforcement active-shooter all-call is just asking for trouble.
Get Shorty
That’s what Kyle Defoor recommends, anyway:
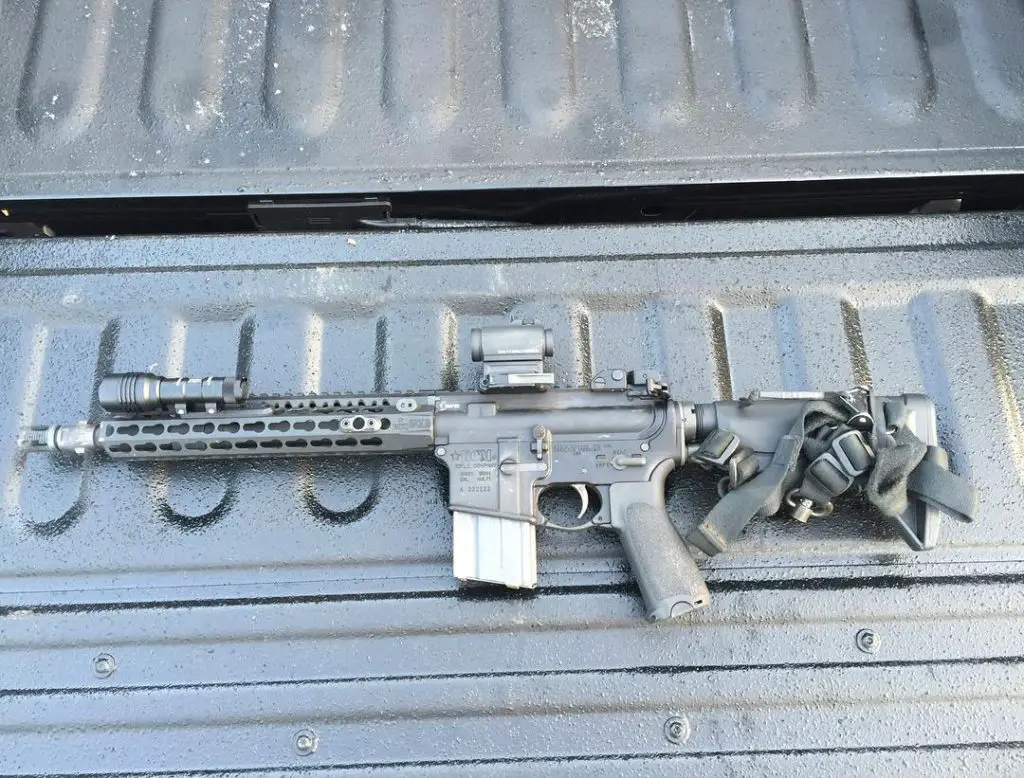
The version on Instagram labels the gear clockwise from the light: Streamlight LLC (light), Aimpoint USA (micro red-dot), Bobro Engineering (QD sight mount), Bravo Company USA (the gun, grip, rail, etc.), and Arisaka Defense (the light mount). Kyle adds:
Lo vis carbine classes makes everyone appreciate 20 rd mags, Aimpoint Micros and of course shorty barrels.
Rail system is KMR, barrel is an 11½” 1/7 barrel from BCM, running a Gemtech suppressor.
Here’s his trick for running several optics and several guns whilst holding zero.
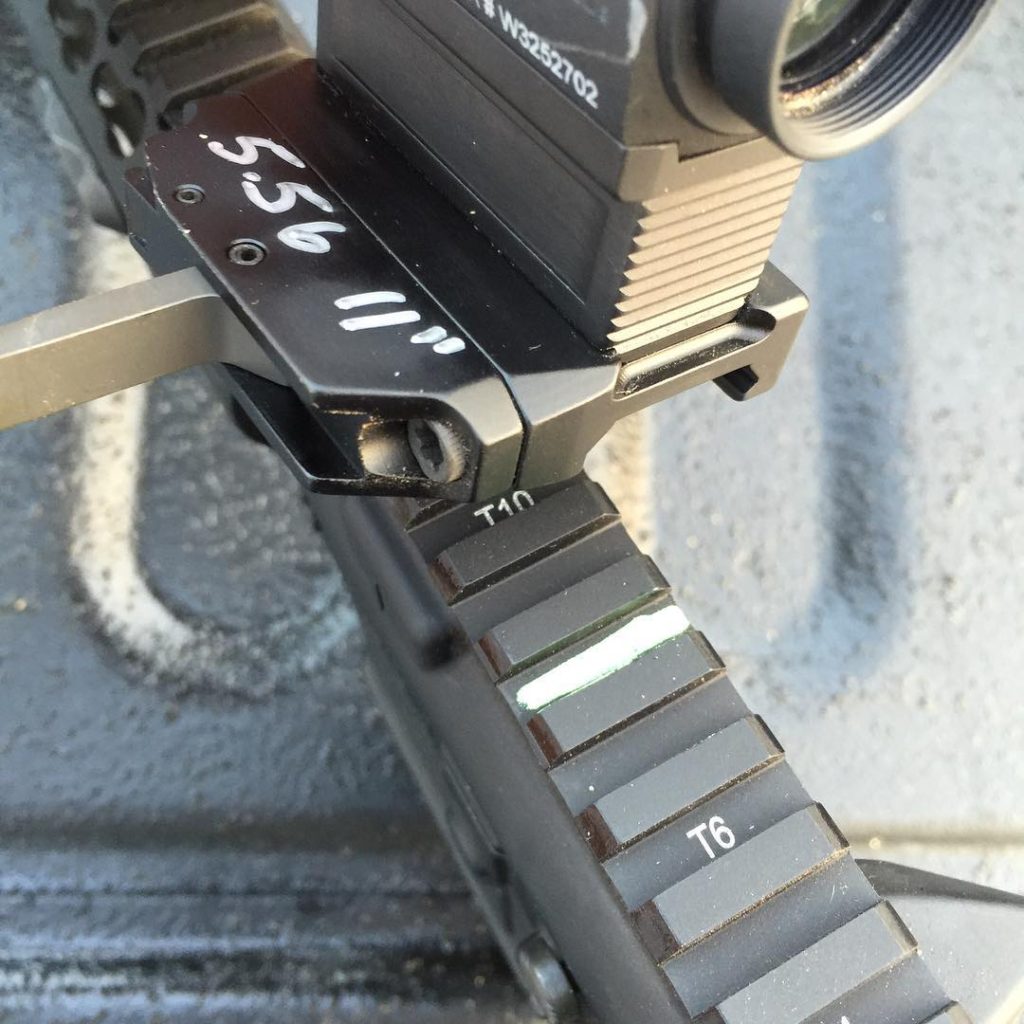
Explanation:
My RDS and LPV share the same rail slot on all my carbines and each optic is marked for what it’s zeroed to. This makes for ease of travel when doing multiple courses where customers use different optics and for quickly grabbing whichever I need at the time and knowing its solid. It’s also a great option for owning only one carbine and getting the most out of it.
If you’re not reading his Instagram feed, you should probably consider it.
Kevin was a former Special Forces weapons man (MOS 18B, before the 18 series, 11B with Skill Qualification Indicator of S). His focus was on weapons: their history, effects and employment. He started WeaponsMan.com in 2011 and operated it until he passed away in 2017. His work is being preserved here at the request of his family.